
- Best for
- Move-ready spa vibes
- Time
- 2–3 hours
- Difficulty
- Beginner (candle pour)
- Renter-safe
- No-drill, packs flat
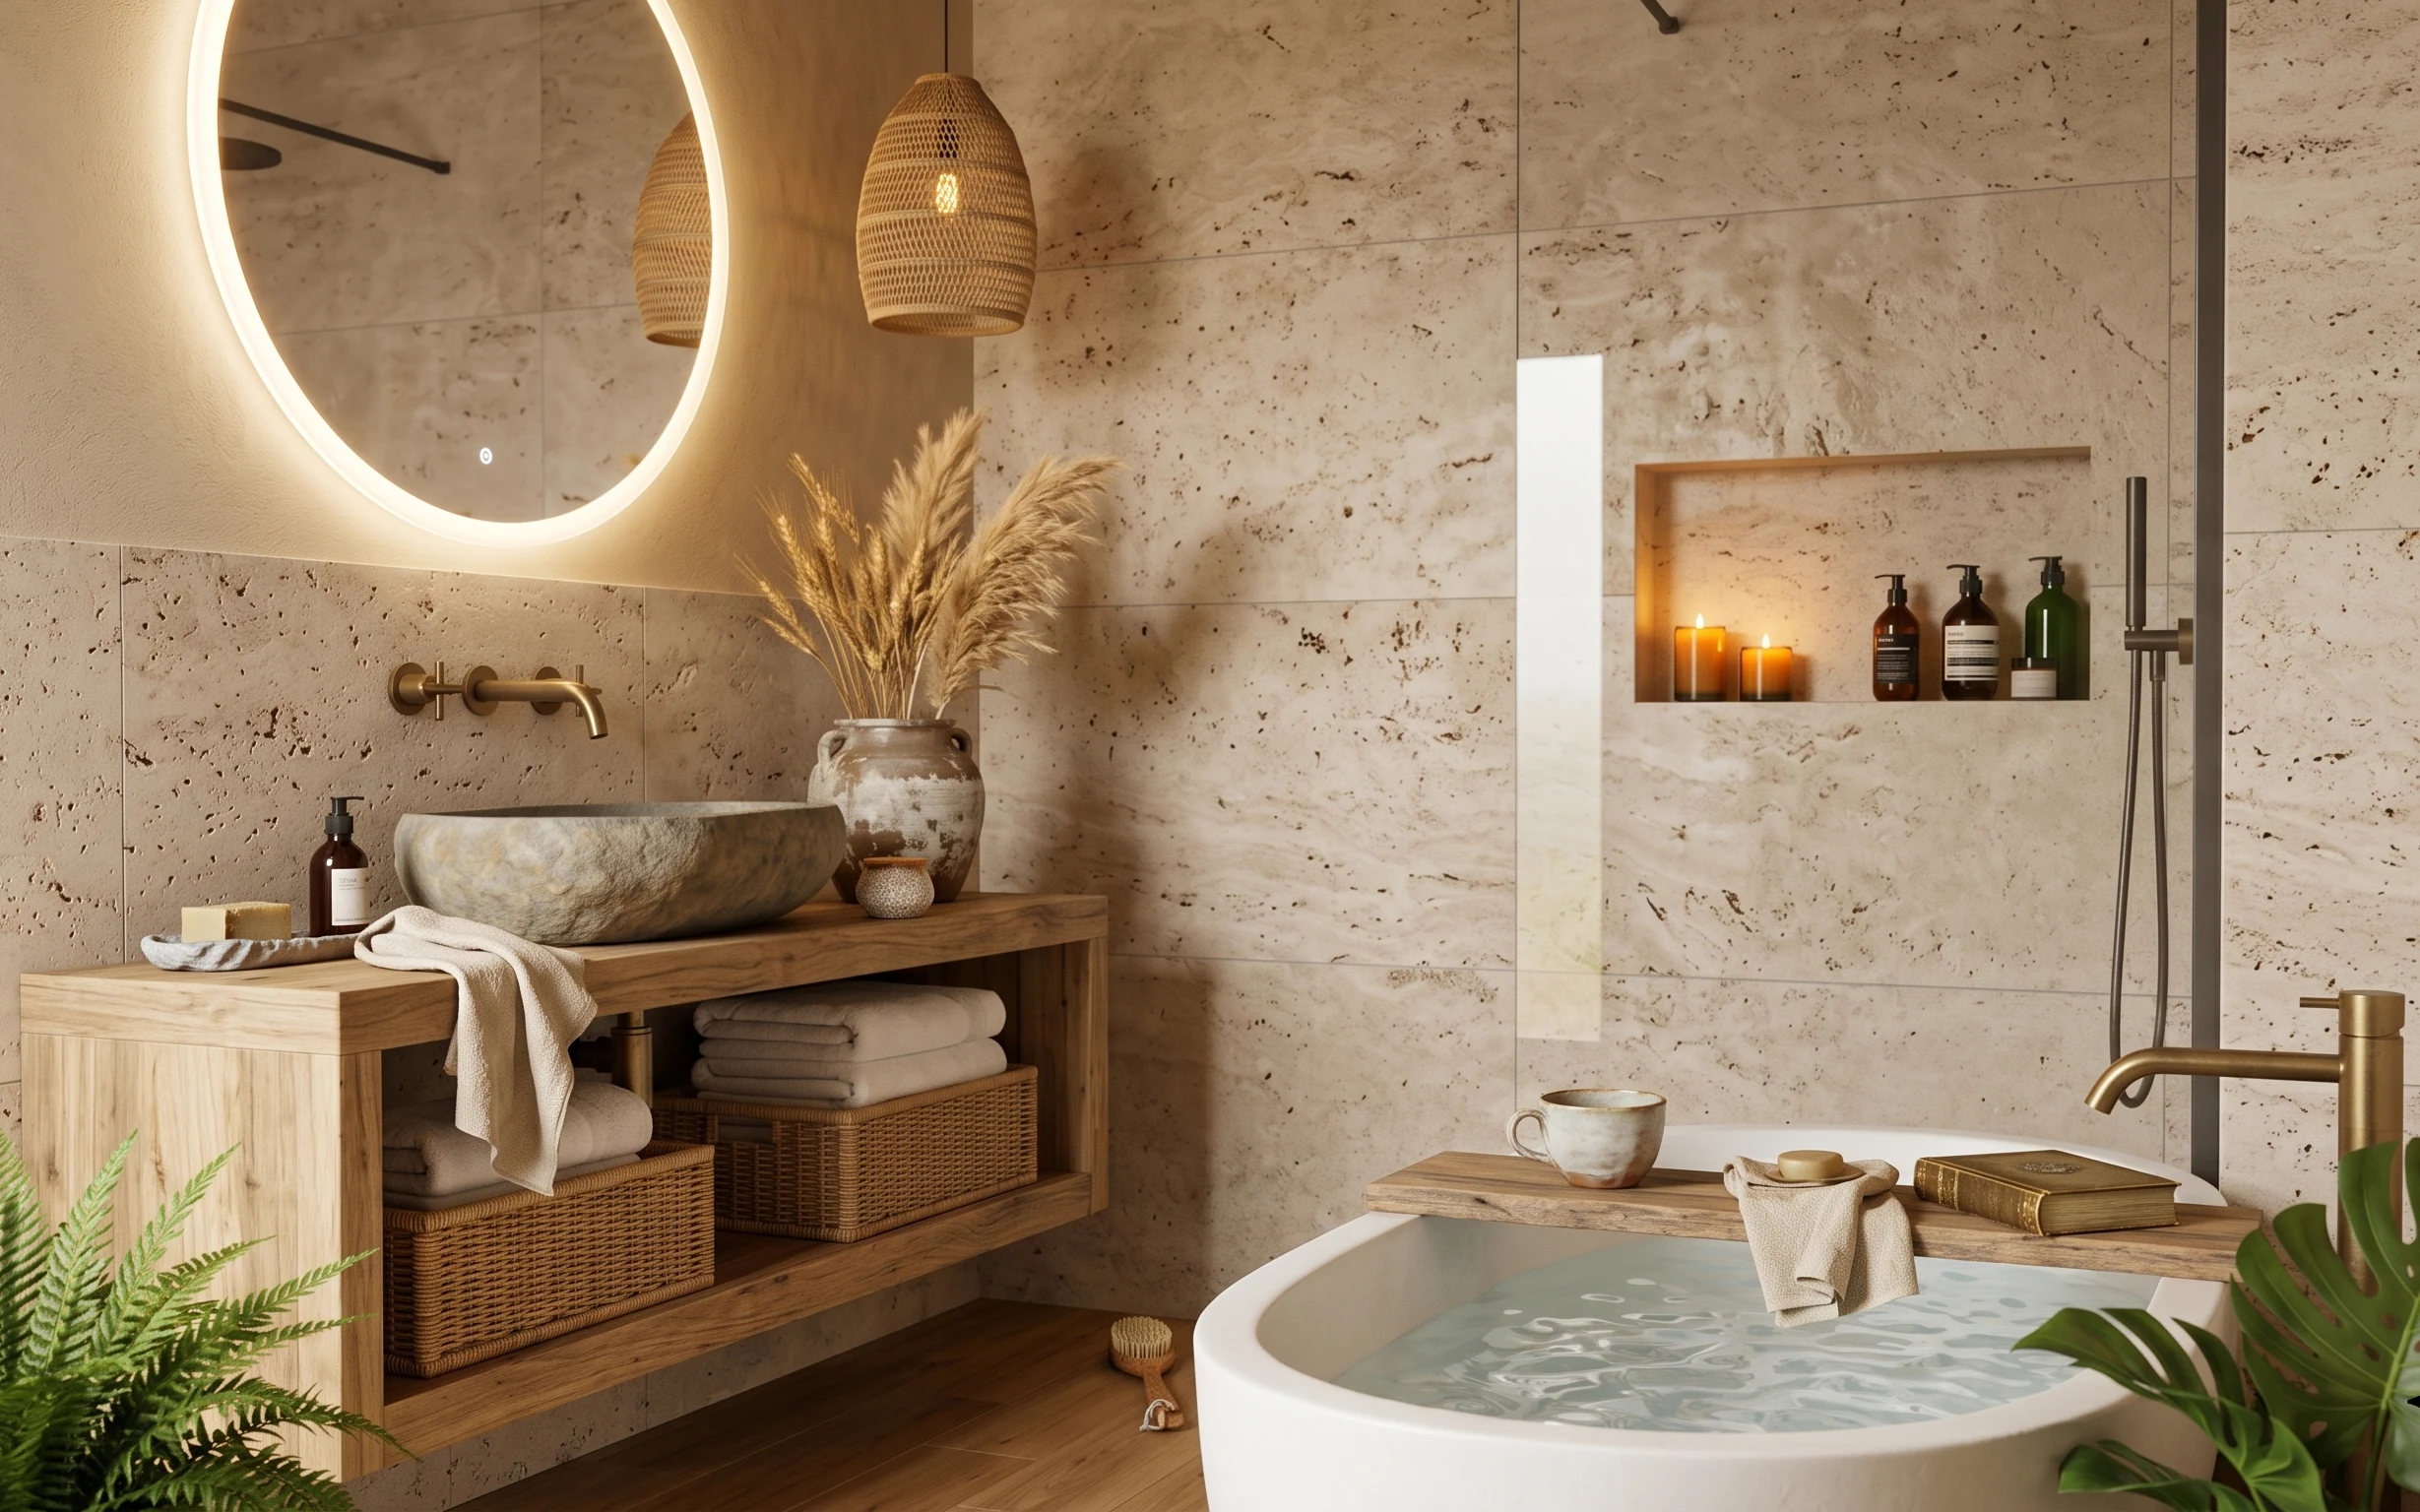
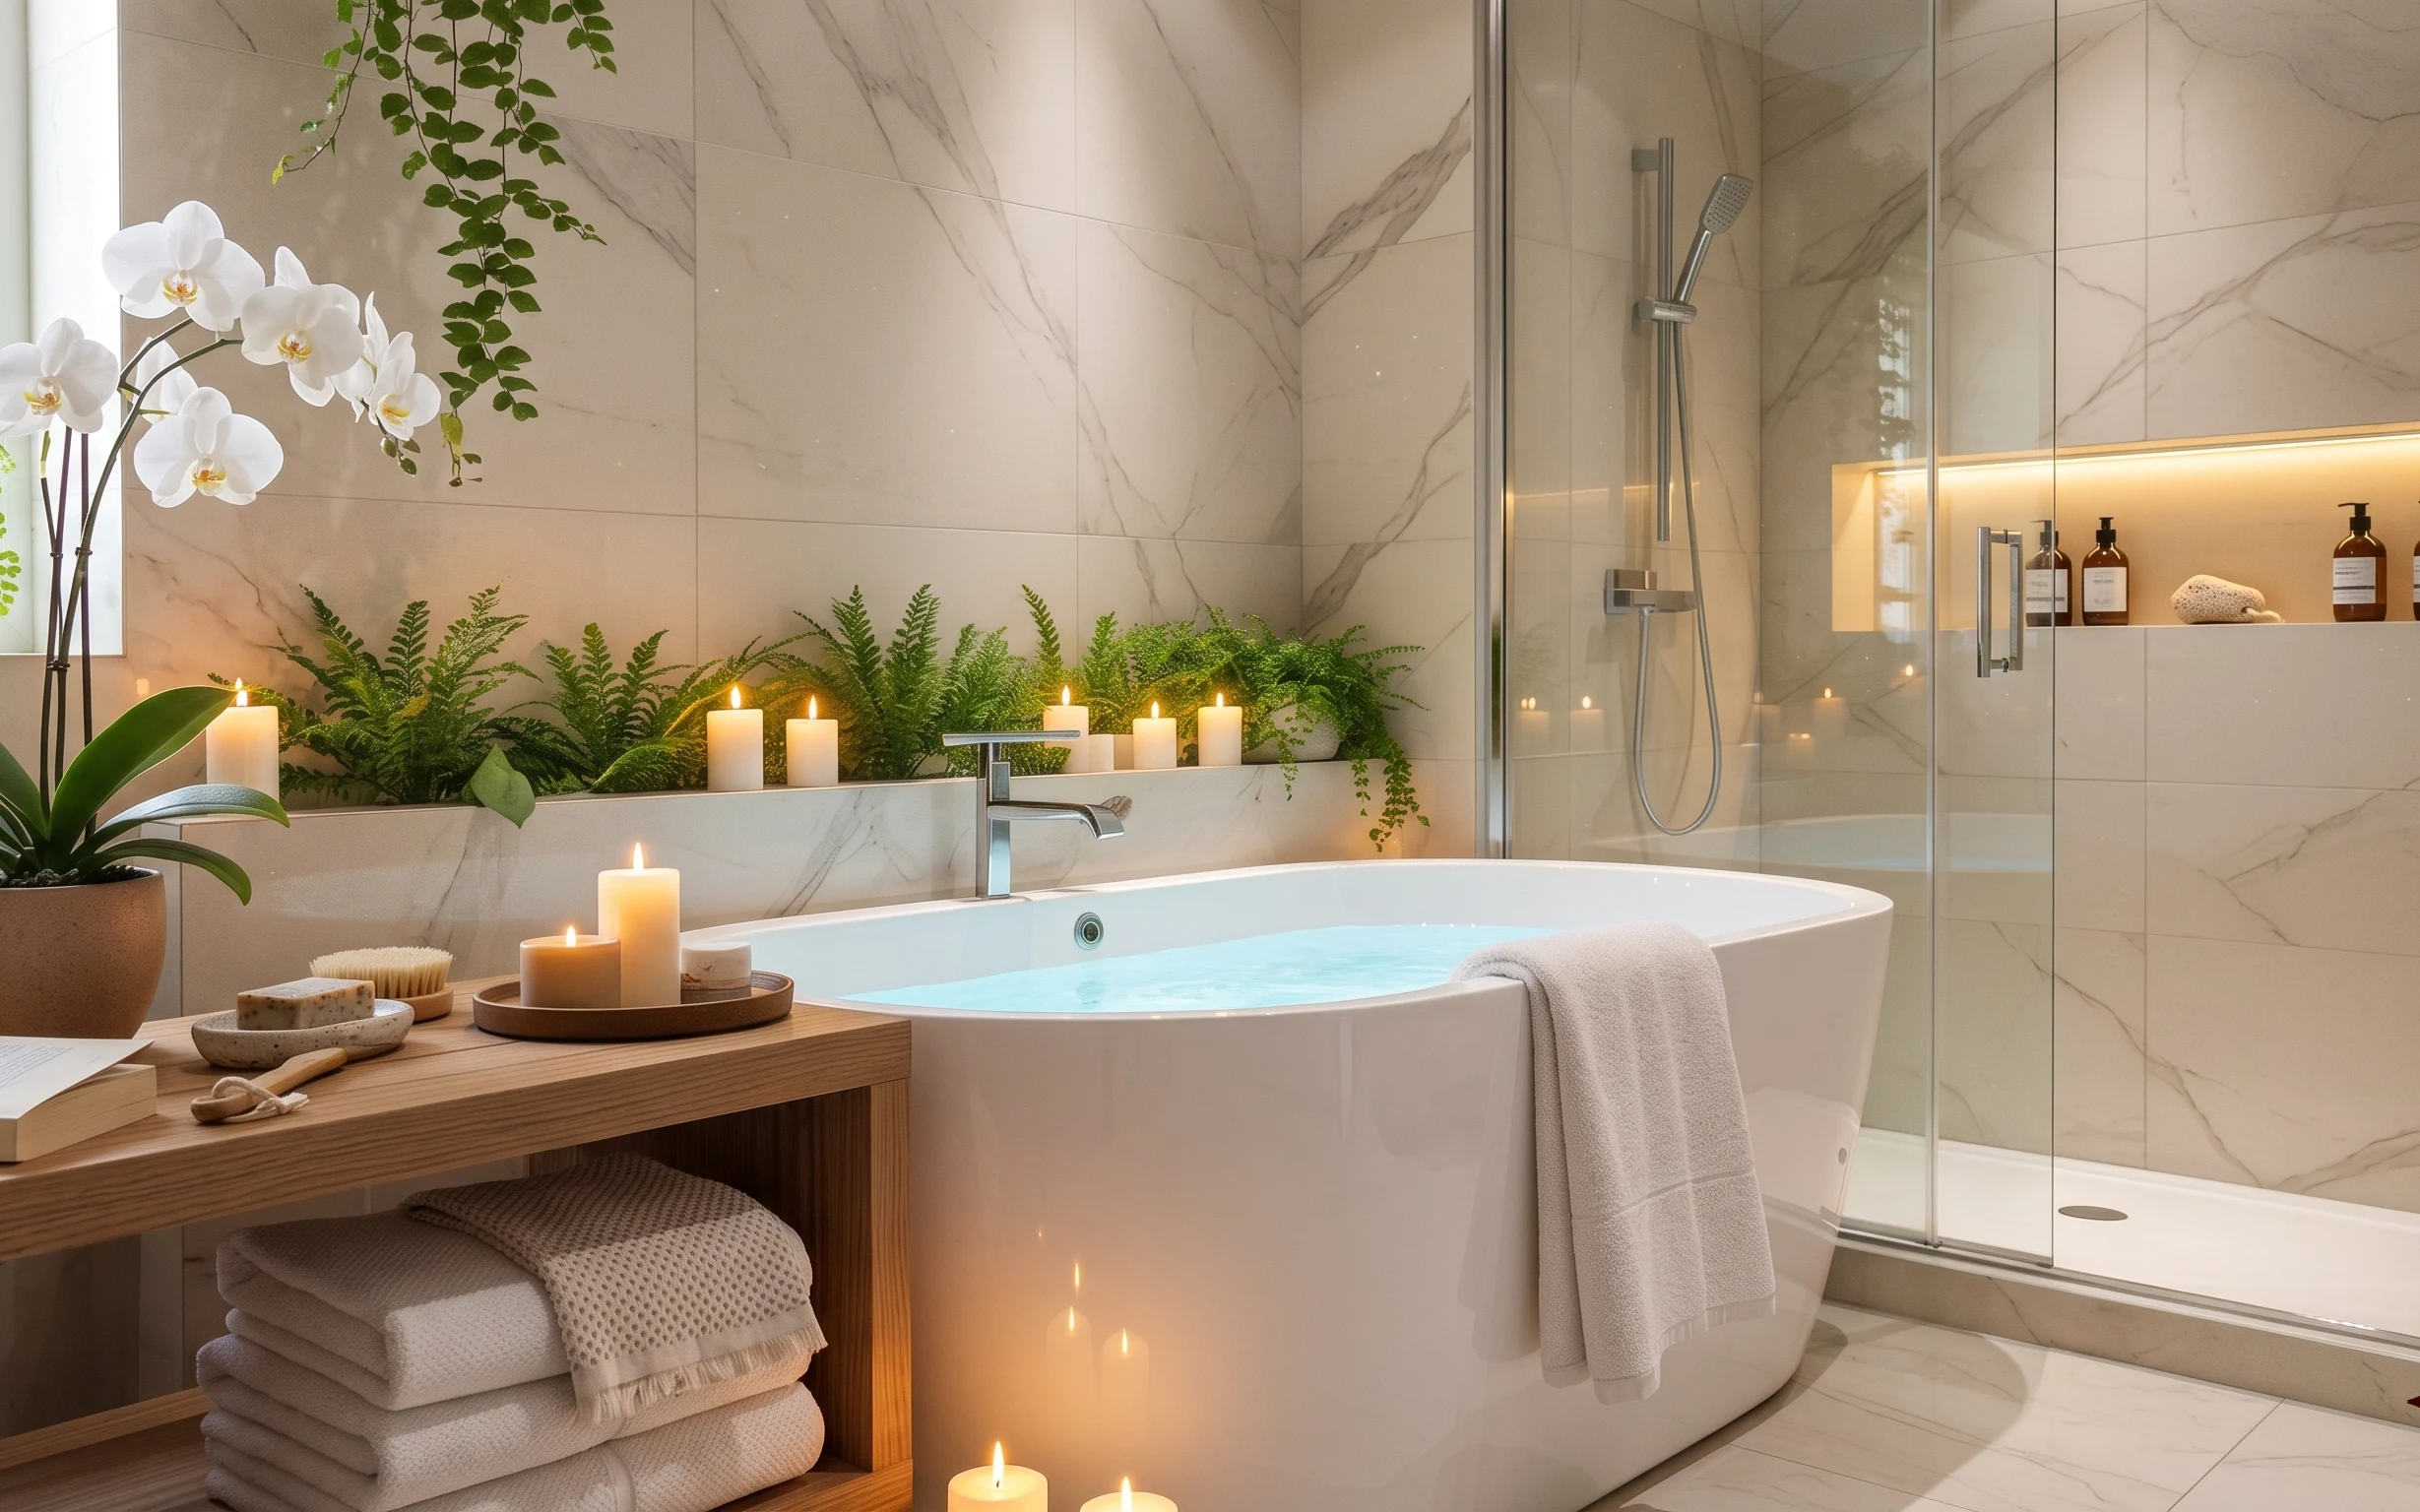
Why this terracotta-and-fern spa bathroom is the move-friendly spa bathroom of 2026
The easiest way to steal this bathroom’s vibe is to copy the texture stack: soft towels, a woven throw, and warm ceramics. The stone tile and the gold fixtures set the tone, so the accessories do the “designer” work—especially on the bench and shelf niche. I’m looking at the beige woven throw draped over the wood storage bench, the stacked towels tucked into woven baskets, and the ceramic vase holding airy pampas. For shared housing, this matters because textiles and decor are the only things you can take with you without thinking about the landlord’s rules.
My first shared-house bathroom refresh was all wrong: I over-bought small decor pieces and ended up with a cluttered shelf that looked messy in the mirror’s glow. This time I stopped chasing “cute” and leaned into repeating materials—woven + ceramic + warm candlelight. The result feels intentional even when the shelf is doing double duty as storage. That’s the whole trick: build a calm base, then add one warm point of light.
Layer 1 — beige woven throw draped over the storage bench ($60) texture that reads like a spa
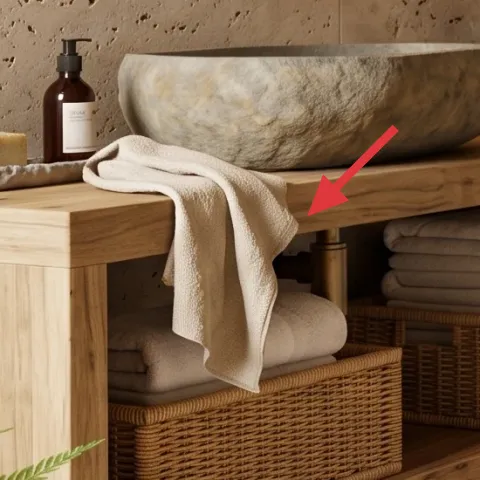
The beige woven throw is the first thing your eye lands on because it turns a flat wood bench into something dimensional. It’s draped, not folded “perfectly,” so it looks lived-in from across the bathroom—exactly what you want in a shared space. I like this over buying a printed textile set because the neutral weave plays well with the stone tile and the gold hardware already in place. The trade-off is that it does need a quick shake-out if it gets damp, but it’s still easy to launder or replace. When you move, it packs flat and doesn’t demand any hardware.
Layer by placement, not quantity
Use one throw as the anchor, then keep the rest of the textiles folded and tidy so the texture still reads.
Layer 2 — woven storage baskets beneath the folded towels ($45) tucks away the extra
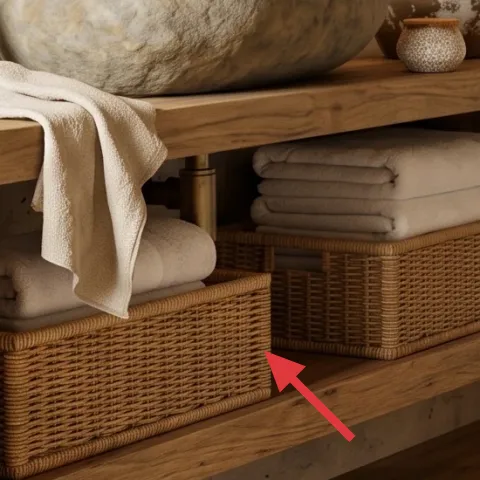
Those woven storage baskets are doing the quiet work: they make the towel area look composed instead of “where did everything go?” Even with the stone tile background, the baskets add warmth and break up the straight lines of the wood bench. I’d pick baskets over a matching hamper because they hold their shape and keep towels accessible for quick grabs. The downside is baskets take a little more visual space than plastic bins, so you’ll want to keep them only where you need storage. In a move, they go in the same box as towels, and you can keep using them regardless of the bathroom layout.
Keep the basket silhouette consistent
Stick to one weave tone so the bathroom stays earthy-neutrals instead of turning into a mix of textures.
Layer 3 — pampas grass stems in a ceramic vase ($55) adds height without feeling cluttered
Pampas stems give you that tall, airy “spa corner” feeling without adding any floor objects. In the photo they rise from the ceramic vase, softening the whole scene around the shelf niche and making the gold details feel calmer. This is the moveable alternative to wall art: you get vertical interest without drilling or committing to a fixed install. The trade-off is that pampas needs a little airflow, so don’t place it where it will get wet or directly hit by steam. It’s also easy to pack—cut stems into sections if needed—then fluff again once you’re set in the next place.
Fluff, then restrain with a loose wrap
A quick shake after packing helps the shape bounce back for that full, feathery look.
Layer 4 — ceramic vase beside the sink niche ($30) grounds the organics
The ceramic vase is the visual “anchor” that keeps pampas from looking accidental. Its mottled, warm finish ties into the beige throw and the golden candle holders, so the bathroom reads cohesive instead of random. I’m choosing a ceramic vase over a glass one because the glaze and speckling echo the stone tile’s texture—subtle, but it makes a difference in how the light reflects. The trade-off is weight: ceramic is heavier than plastic, so pack it carefully in paper or a towel. For impermanence, though, it’s perfect—no landlord approvals, and it survives moves better than most delicate decor.
Don’t pick a too-tiny mouth
If the opening is narrow, pampas stems won’t sit naturally and the whole arrangement looks top-heavy.
Layer 5 — gold candle holders with candles ($45) warm light you can actually feel
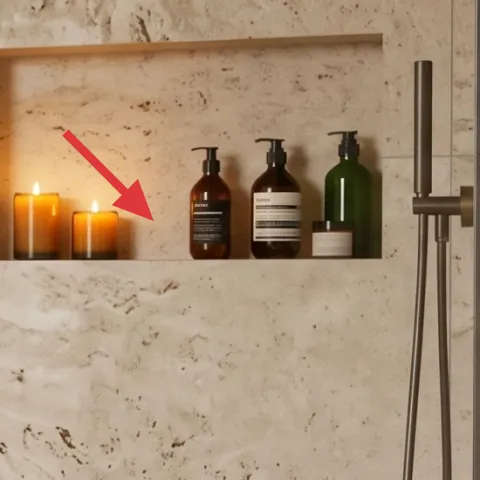
These candles create the “evening bath” mood—soft light against stone tile—without needing any electrical changes. The gold holders also echo the bathroom’s metal accents, so they belong even in a room that already has lighting built in. Instead of buying a whole candle set, this layer is about making one candle moment look intentional on the shelf niche where light can bounce around. The trade-off is safety: candles should stay away from towels and steam, and you’ll want to keep the flame trimmed and monitored. Still, candles are fully packable, and swapping scents seasonally is a fun shared-house perk.
Make it instead of buying it
This candle pour DIY recreates the warm, glassy glow effect using simple wax and fragrance—no hardware changes, just a movable candle moment.
Materials
- Soy wax flakes — 1 lb — craft store — $20
- Wick + tabs (set of 2–4) — assorted sizes — craft store — $6
- Candle fragrance oil — 1 small bottle — craft store — $5
- Disposable measuring cup + stirring stick supplies — set — craft store — $7
- Pint/jar container (or reuse an empty small jar) — 1 jar — kitchen supply — $2
Steps
- Choose a small jar/container that fits your shelf niche size.
- Center the wick in the jar using a wick sticker or a temporary foam plug.
- Warm the wax flakes in a double boiler until fully melted.
- Remove from heat, stir in fragrance oil according to the label.
- Pour slowly into the jar, then tap the jar gently to release bubbles.
- Let the candle cool and set until fully firm.
- Trim the wick to about 1/4 inch.
- Cure the candle for 24–48 hours before your first burn.
Total DIY cost: $40 — saves about $5 over buying.
Layer 6 — wooden tray on the tub ledge ($35) makes the ledge feel curated
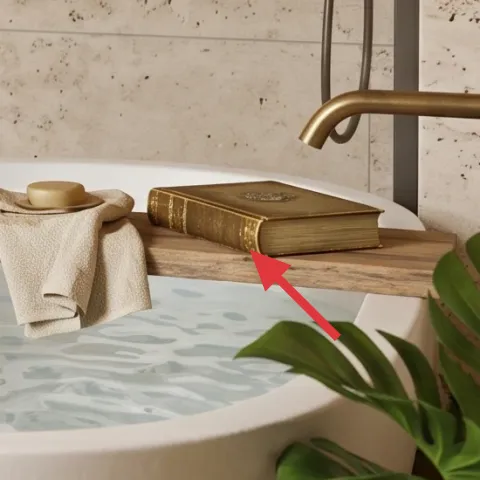
A wooden tray is how you make “bathroom supplies” look styled instead of random. In the photo it groups the mug, books, and small objects into one tidy zone, which matters because bathroom ledges tend to get cluttered fast in shared housing. I like this over using a small basket because trays define edges—your eye can read the composition quickly. The trade-off is that you’ll need to wipe it down if water splashes, but wood still looks better than bare surfaces over time. When it’s move time, it wraps easily and fits flat into a rental-van load.
Keep objects to one height
If everything is the same level, the tray reads calm even when the room is small.
Layer 7 — monstera plant leaves in the bottom-right corner ($60) adds a fresh pop of green
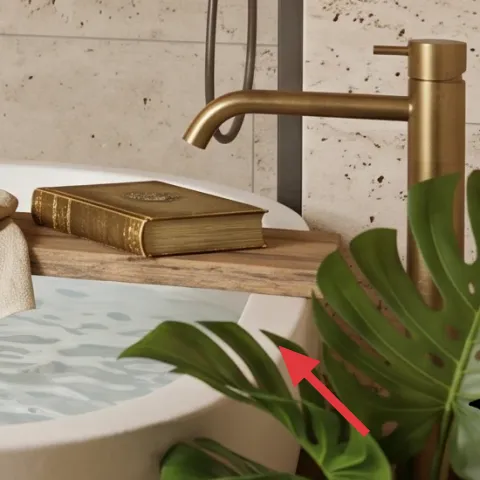
The monstera leaves add exactly one “fresh” color into all those warm neutrals, and the large leaf shape keeps it from looking like a tiny accent. Because it sits in the corner foreground, it frames the tub area and balances the pampas’ vertical softness. I’d choose this over another bunch of dried stems because live or faux leaves give you that clean silhouette, even on days when you don’t want to refresh anything. The trade-off is space: large leaves need clear breathing room, or they look cramped. For moving, it’s simple—wrap leaves gently, store the pot or stems safely, and start fresh in the next bathroom.
Match scale to your bathroom’s light
A room with warm, low light can handle bolder leaf shapes without looking busy.
The cost, layer by layer
| Layer | Item | Cost |
|---|---|---|
| 1 | Beige woven throw | $60 |
| 2 | Woven storage baskets | $45 |
| 3 | Pampas grass stems | $55 |
| 4 | Ceramic vase | $30 |
| 5 | Gold candle moment (DIY pour equivalent) | $45 |
| 6 | Wooden tray for the tub ledge | $35 |
| 7 | Monstera plant | $60 |
| Total | $330 | |
If you want a cheaper variant, keep the pampas + vase, but swap the monstera for a smaller tabletop plant and choose one large tray instead of any extra holders. Candle light still matters most—so prioritize a good container and a clean burn.
What worked, what didn't (across the whole room)
The strongest wins are the texture repeats and the “grouping” moments: throw + baskets + candles read intentional, even with a limited budget. The only thing that can go wrong is over-stuffing shelves—when everything is small and decorative, the look turns busy fast.
What worked
- The beige woven throw gives instant softness against stone tile without looking costume-like.
- Woven baskets make folded towels feel organized instead of merely stored.
- Pampas height balances the bathroom’s horizontal lines and keeps the corner from feeling flat.
- Gold candlelight warms up the whole palette after dark and visually unifies nearby metal.
- The wooden tray defines a supplies zone, so the tub ledge stays camera-ready.
- One big leaf (monstera) adds a green note that doesn’t compete with neutrals.
What didn't
- Small decor placed randomly on shelves looks messy next to the organized towel area.
- Too many candle containers makes the shelf feel cluttered instead of calm.
- Thicker, heavier faux stems can look artificial if the vase looks too delicate.
- A tray that’s too small makes stacking mugs and books feel crowded.
- If towels aren’t color-coordinated, the woven baskets can still read chaotic.
What we'd skip if we did it again
Skip extra matching knickknacks for the shelf niche. In a bathroom, the mirror glare and stone tile make tiny objects look scattered, even if they’re technically “pretty.” One candle moment plus the vase/pampas rhythm is usually enough.
Skip buying a whole new set of bathroom textiles all at once. A throw and one coordinated towel palette will get you 80% of the effect, and it’s easier to replace later when you move or when shared-house schedules shift.
Skip candle containers that are hard to lift and repack. If the jar shape doesn’t fit your shelf niche or won’t pack safely, it turns into clutter during moves—better to use one simple container you can reuse and pour into again.
Frequently asked
How long does this bathroom refresh take?
Plan for about 2–3 hours total. The textiles and baskets are the fastest part—swap, stack, and style. The candle pour DIY takes the most “hands-off” time because the wax needs to cool and cure, but you can still arrange everything else while it sets.
Is this really renter- and shared-house safe?
Yes, because the layers are all movable: towels, a throw, storage baskets, a ceramic vase with pampas, candles, and a wooden tray. There’s no drilling, no painting, and no need to replace anything fixed like plumbing or built-in fixtures. When a lease ends, you pack textiles and decor first.
What if my bathroom is smaller or has less shelf space?
Reduce the footprint, don’t reduce the idea. Keep the throw + basket stacking, but swap the monstera for a smaller tabletop plant. For candles, use one main candle moment instead of multiple containers so the shelf still reads as a single grouped composition.
What if I don’t want real candles—can I use LED?
Yes. LED candles still give you the warm “flicker” effect, which is what changes the mood. Choose holders with similar gold tone and place them where they face the mirror so the light reads soft without a flame. The styling logic stays the same.
Where should I shop differently than a typical bathroom aisle?
Skip the bright-white bathroom section and go to home textile, gift, and craft stores for the key materials: throws, woven baskets, candle jars, and fragrance. For plants, look for pampas stems and monstera leaves in decor-focused retailers so the shapes look intentional.
What’s the biggest mistake people make in spa-style bathrooms?
They start adding decor before getting the storage rhythm right. If towels and baskets feel random, the whole “spa” idea collapses into clutter. Start with one texture anchor (throw), then keep shelf objects grouped into a single tray or candle moment.
More in Bathroom
Texture-first spa bathroom refresh, $400
A warm, renter-safe spa bathroom refresh for shared housing on a $400 budget. Focus stays on moveable textiles and tabletop details—throw, …
4 no-drill ways to soften a bathtub nook
A calm bathtub nook on a $400 refresh budget—built with candles, a painted planter pot, layered greenery, and a faucet update. The result f…
What $300 buys: a move-friendly spa bathroom refresh
Budget a $300 spa bathroom refresh built for shared living: swap in a fresh bath mat, a towel stack, and moveable styling objects. The big …