
- Square footage
- Patio setup (small to average)
- Cost
- $152 total for 7 layers
- Difficulty
- Easy
- Renter-safe
- Yes (no drilling)
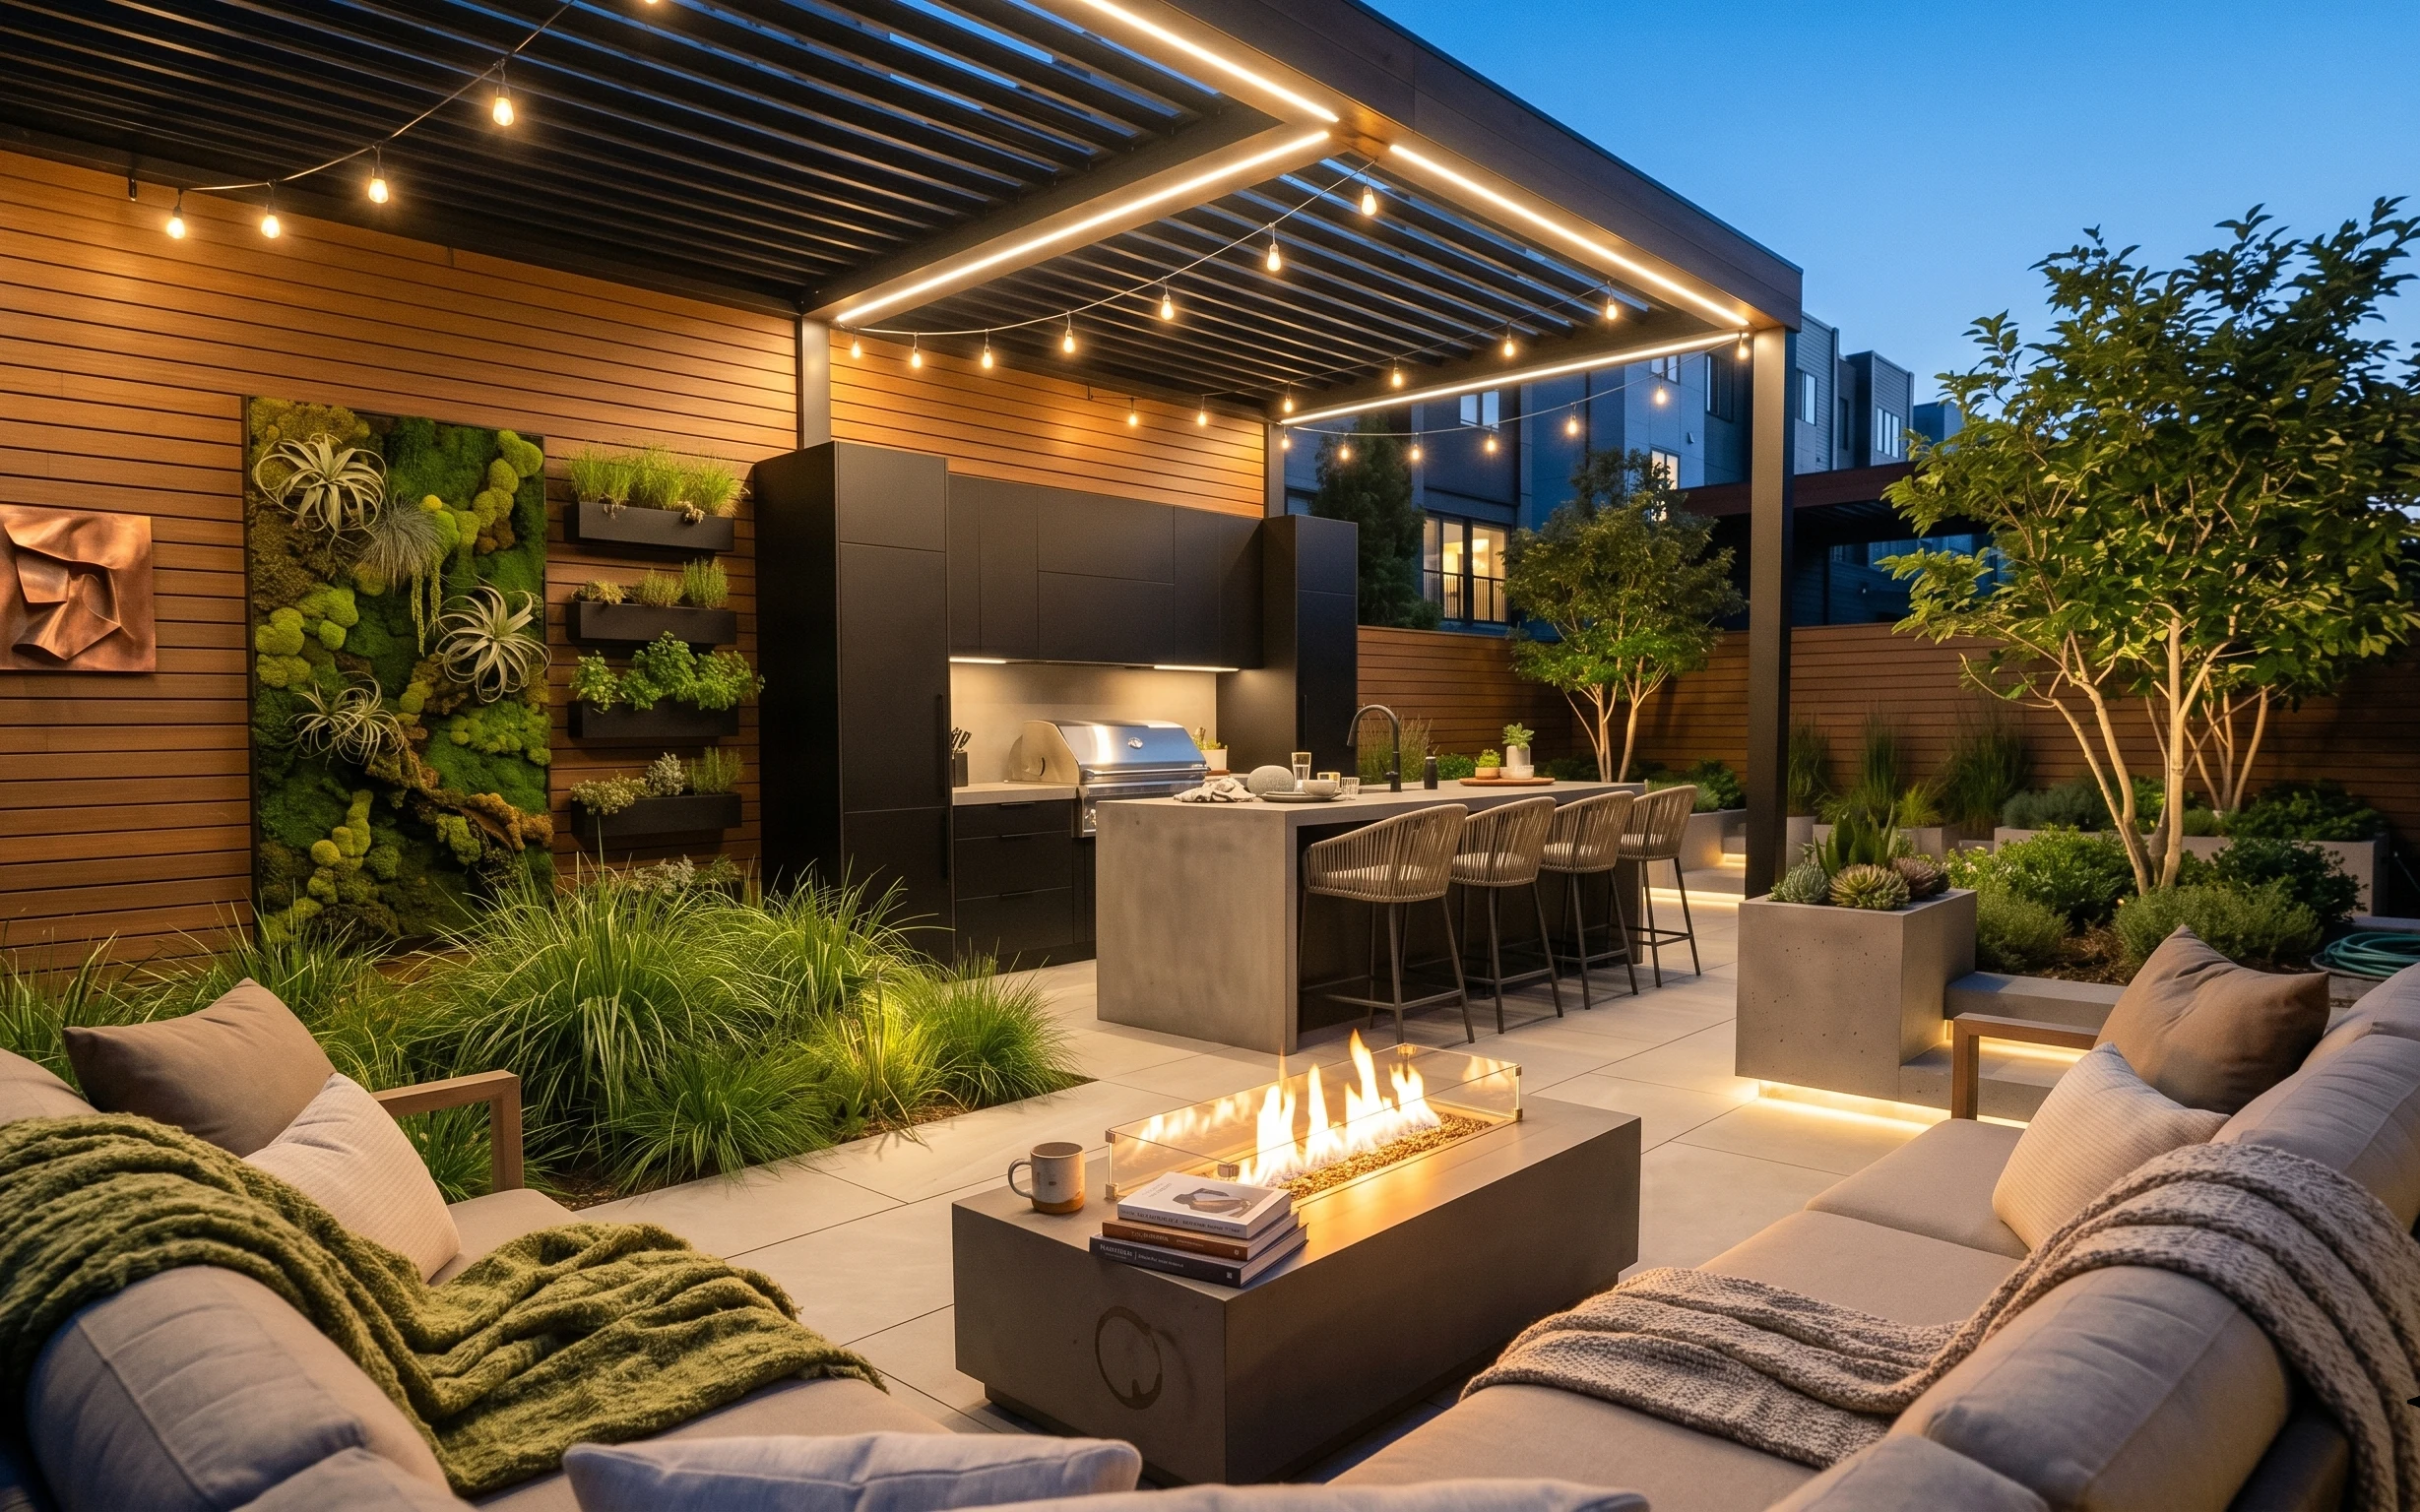
Why string-lit moss and wood is the patio lounge of 2026
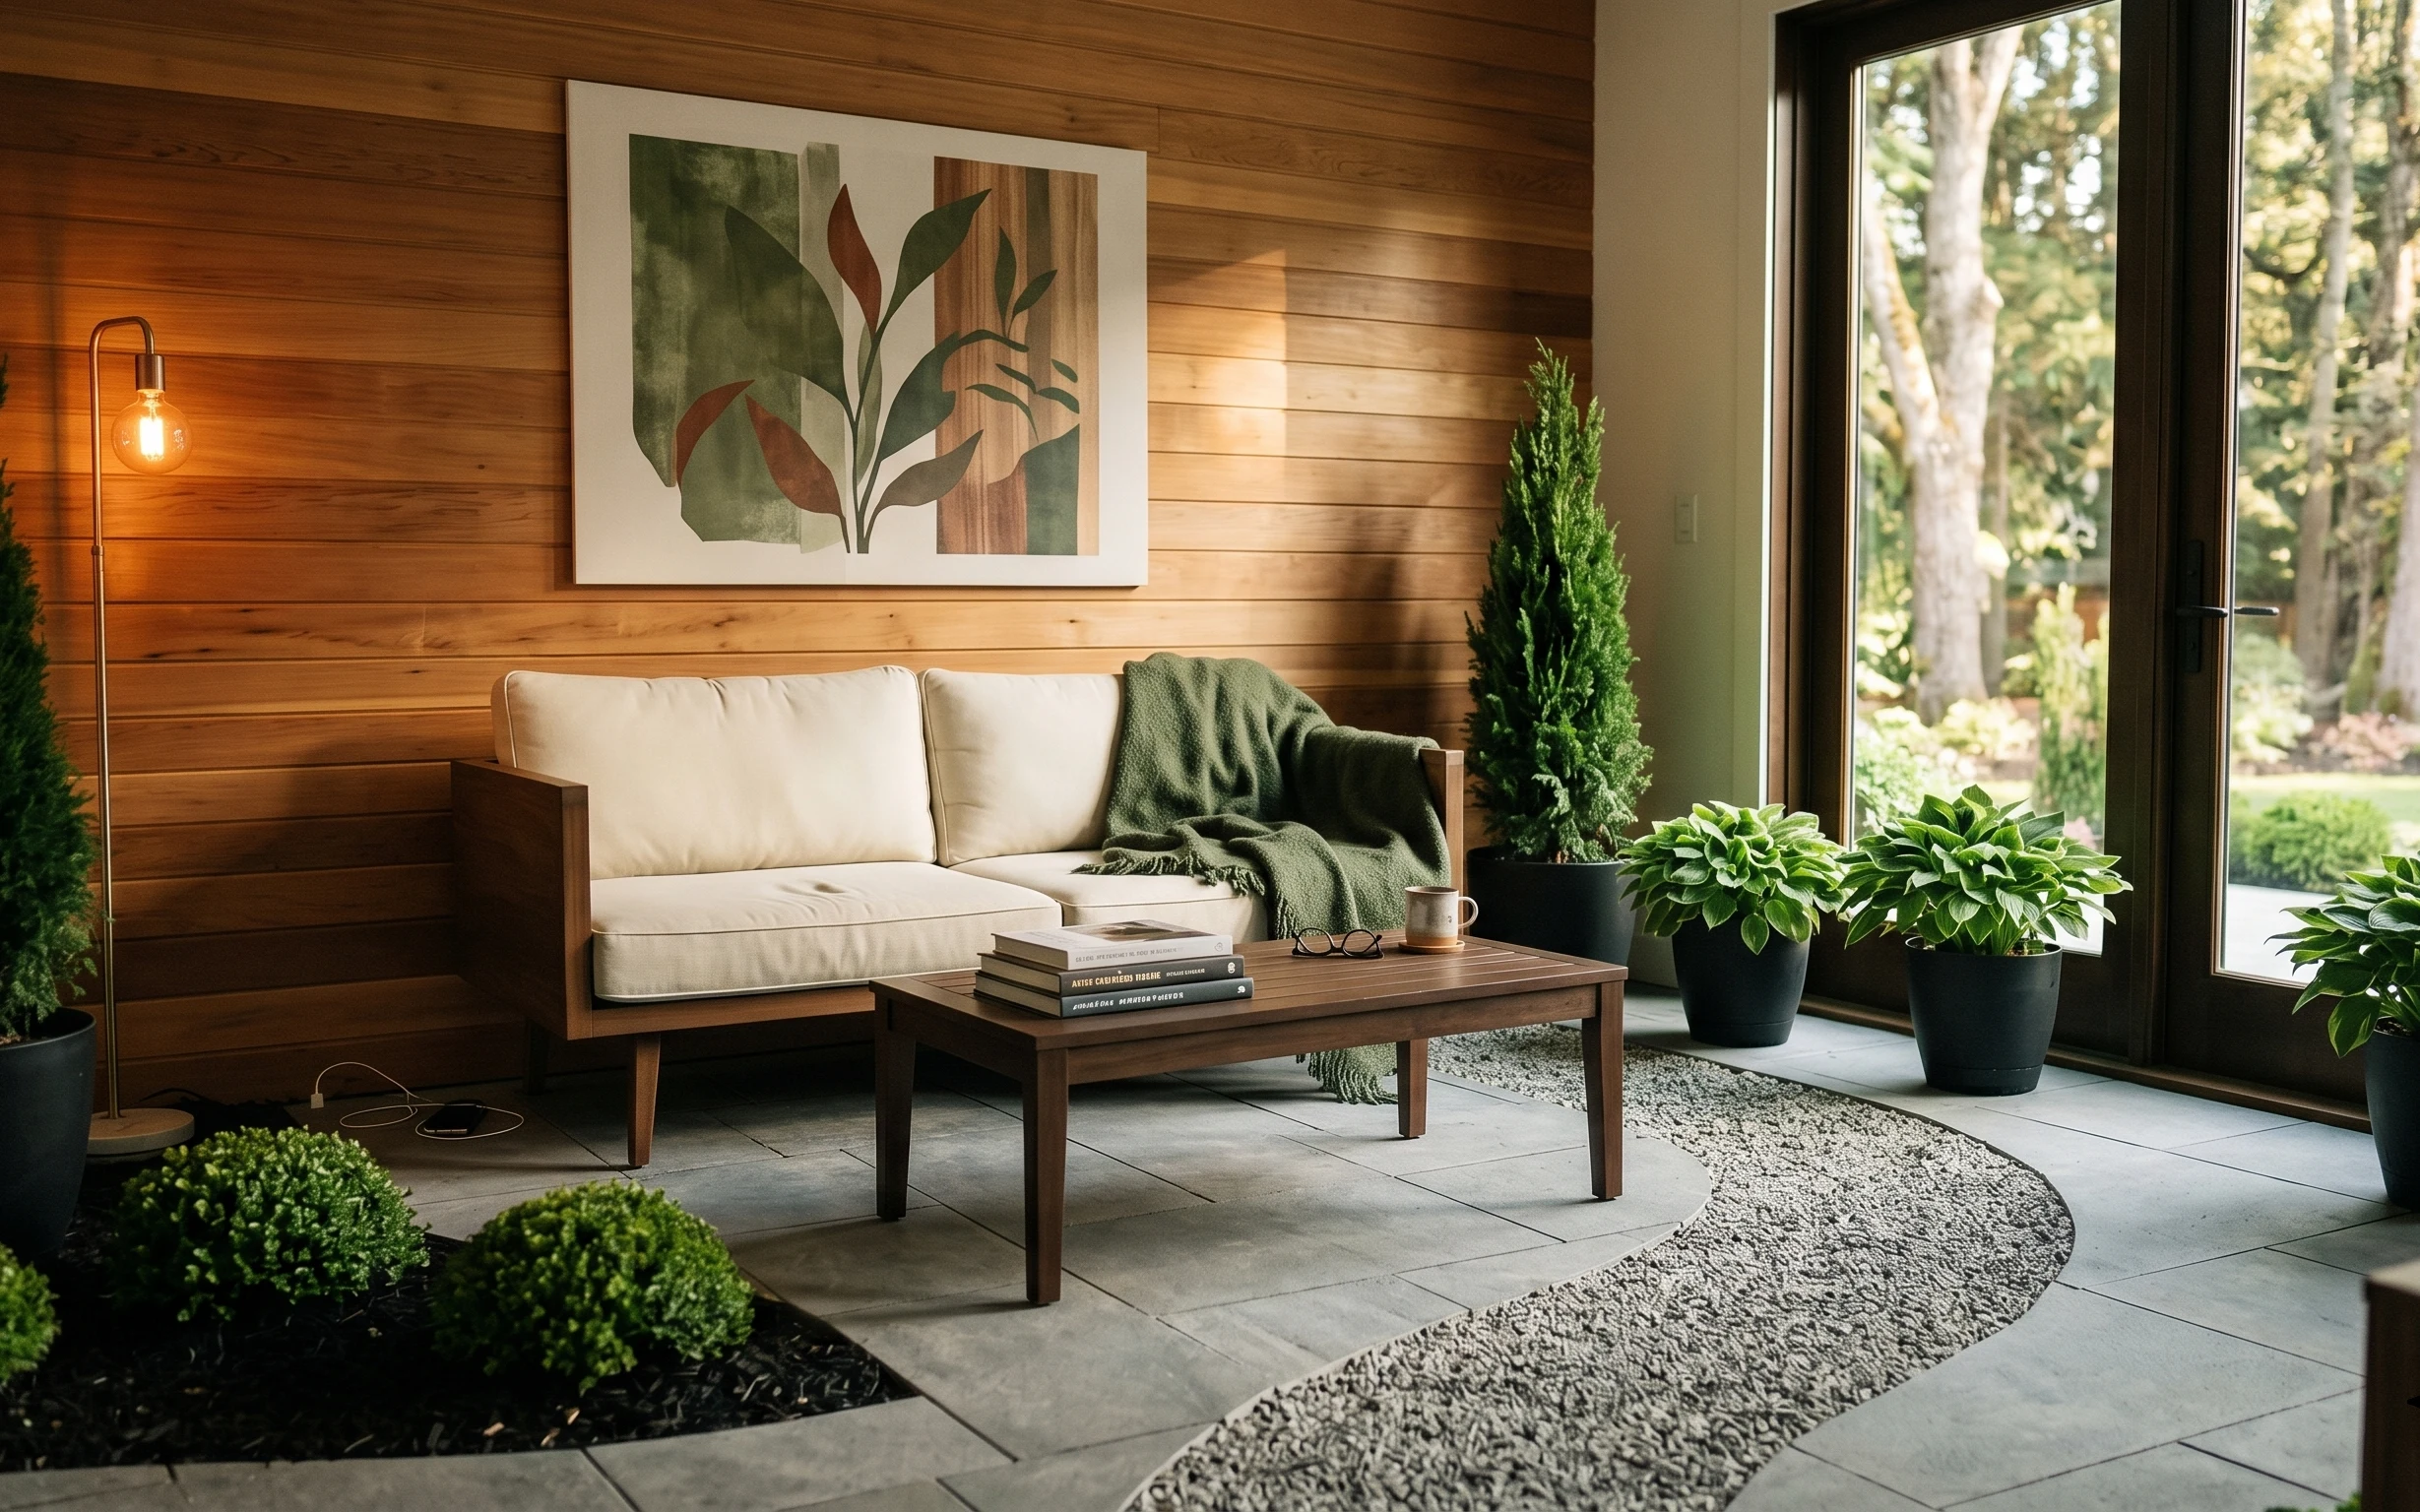
The first thing I notice here isn’t the hardscape—it’s the glow. Those string lights bounce warm light across the wood slat paneling, while the green moss wall brings an almost living “texture finish” behind the seating. The mix of light gray tile, warm brown wood, and deep green plants reads layered instead of matchy. For shared housing and quick moves, the trick is to spend on repeatable texture: a couple of throw pieces, one framed art moment, and lighting you can roll up and take with you.
I used to overthink outdoor “decor sets” and end up with matching pieces that looked great for one season and then didn’t pack well. In photos like this, the styling works because the materials do the talking—soft textiles against hard tile, and greenery against straight wood lines. I also caught myself assuming I needed something built-in to pull it off. You don’t: you just need a few portable anchors that photograph well at dusk.
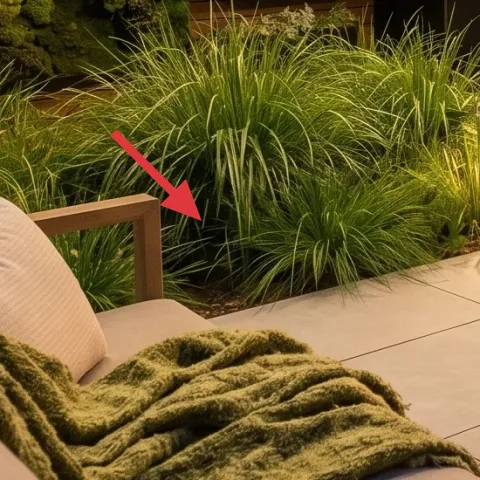
Layer 1 — green throw blanket ($25) adds the same depth as the moss wall

This green throw blanket sits over the outdoor sofa cushions, and it does two jobs at once: it ties into the moss vertical wall and it softens the whole scene against the light gray tile. The shade reads like fresh growth rather than dark “holiday” green, so it keeps the patio feeling bright even in evening light. The alternative is a neutral throw, which can look too flat once the lights turn on. I’d choose this color family because it’s visually connected to the greenery already present, without needing matching “sets.”
Match by undertone, not by exact green
If your plants lean yellow-green, pick a throw with that same warmth; it keeps the room from looking accidentally mismatched.
Layer 2 — light beige throw pillows ($12) makes the seating feel intentional
The light beige throw pillows keep the sofa from reading “bare cushions” and they balance the deeper green blanket. They also reflect string-light warmth without looking chalky, which matters at dusk when everything shifts cooler. A common mistake is adding one patterned pillow and calling it done; outdoors, that can look like you’re trying to cover up missing layering. Instead, these simple solids create a calm base that lets the moss texture and warm wood stay the focus. It’s the easiest swap in a move-friendly budget refresh.
Use pillows for height, not just color
Angle one slightly forward so it creates a soft slope in the photo—still packing-flat for your next place.
Layer 3 — string lights ($15) turns dusk into the “main event”
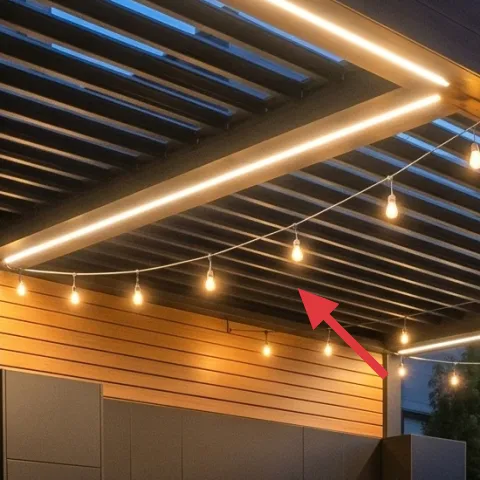
Those string lights are doing the work of an expensive outdoor fixture. Hung along the ceiling beams and kept low enough to skim the wood slats, they create a warm gradient instead of harsh overhead lighting. The trade-off is practical: string lights look best when you can route the cord cleanly and keep bulbs evenly spaced. For a shared-housing audience, that’s perfect—no drilling, no permanent hardware, and you can coil everything back into a box. Choose warm bulbs so the lights flatter the green plants rather than washing them out.
Don’t aim for “super bright” bulbs
Very white light can make moss look flat and tile look gray; warmth keeps the whole patio reading cozy at night.
Layer 4 — framed wall art ($25) gives the wood paneling a portable focal point
That framed wall art on the left side brings a human, collectible-feeling note to the wood slat wall. On a patio, the landscape already provides “busy,” so the best art choice is something that reads crisp in low light and doesn’t fight the greenery. The move-friendly part is the frame itself: it’s an item you can pack and relocate as leases change. If you swap it for nothing at all, the wall can feel oversized and unfinished once the string lights are on. If you swap it for a permanent installation, you’ll regret it later.
Make it instead of buying it
DIY a hand-painted abstract on cardstock to replace the framed wall art—lightweight, cheap, and easy to pack.
Materials
- Cardstock sheets — 5–8 pieces — craft store — $4
- Acrylic paint (small set) — 1 set — craft store — $6
- Small paintbrushes — 2 brushes — craft store — $3
- Painter’s tape — 1 roll — hardware store — $2
- Black fine-tip marker — 1 — craft store — $3
Steps
- Lightly map a simple layout with pencil: 2–3 color fields, one thin line detail.
- Tape off the edges you want clean and crisp for your shapes.
- Paint the largest color area first, keeping brushstrokes loose and varied.
- Let the paint dry fully, then remove the tape to reveal sharp lines.
- Add one or two fine details with the black marker for contrast against the wood.
- Dry the piece again completely, then slide it into the existing frame backing.
Total DIY cost: $18 — saves about $7 over buying.
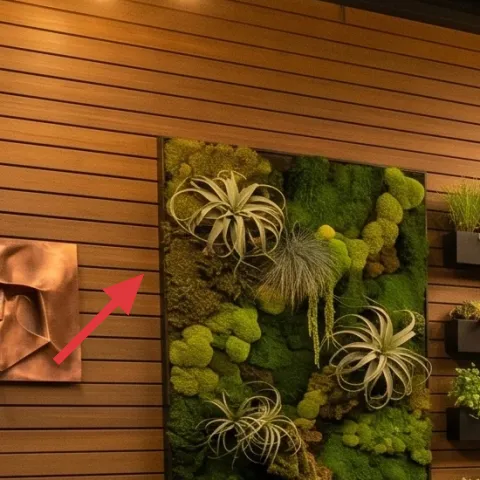
Layer 5 — moss vertical wall ($15) adds texture that reads “designed” in photos
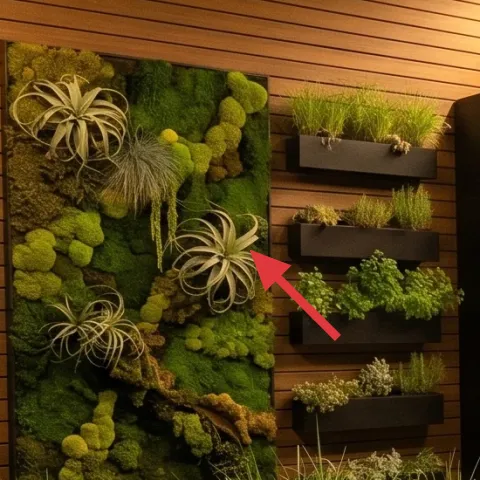
The moss vertical wall is the photo’s main texture hit, and it works because it sits between hard wood lines and soft human seating. Its rounded, velvety surfaces create depth that a flat green poster can’t. For renters/shared spaces, the idea isn’t to build something permanent—it’s to use plant texture that can be moved or replicated in an accessory-sized format. If you try replacing it with only small potted plants, you lose the big “panel” effect and the wall reads emptier. This layer keeps the same visual function: instant greenery at eye level.
Go big with texture, not with lots of tiny pots
A moss-style panel or a cluster of planters creates the same visual mass without complicated staging.
Layer 6 — outdoor coffee table surface ($30) holds the “daily life” styling
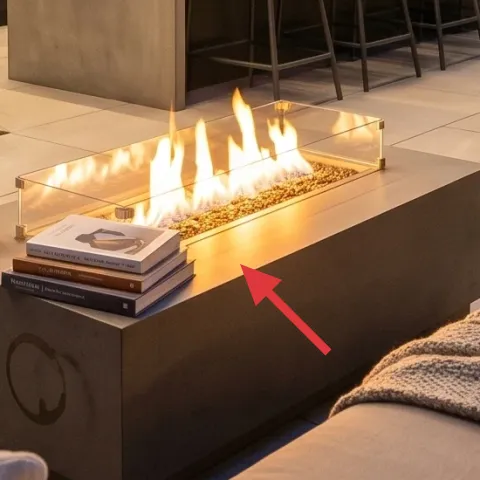
The low coffee table surface in front anchors the seating area and gives the string-lit glow somewhere to land. Even when the flames are doing the background spectacle, a table surface with a couple small objects prevents the foreground from looking empty. The best trade-off here is restraint: one mug and a small stack of books reads collected, while too many items start to look like clutter. Outdoors, I like surfaces that can handle quick wipe-downs, because moving between leases often means traveling with fewer, sturdier props. Use what fits in a tote or box, not fragile décor.
Keep objects the same “height level”
Group by stacking or placing flat items so the table doesn’t look visually top-heavy under warm lighting.
Layer 7 — outdoor bar stools ($30) creates a second seating zone
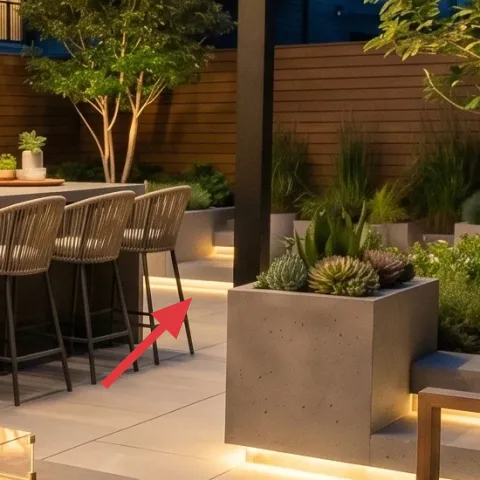
The outdoor bar stools pull your eye toward the kitchen counter area and keep the patio from feeling like one long bench situation. Their vertical lines help frame the moss wall and balance the horizontal wood slats overhead. The trade-off versus a single chair is that stools create more seating capacity and more visual rhythm, but they require a little more storage planning when you move. If you only add one statement stool, the zone can feel unfinished; if you add three or four, it looks intentional in photos. This is one swap that’s still manageable to pack as individual pieces.
Choose lightweight-looking seating
If the frame feels too heavy to move, it won’t survive your next lease as a realistic plan.
The cost, layer by layer
| Layer | Item | Cost |
|---|---|---|
| 1 | Green throw blanket | $25 |
| 2 | Light beige throw pillows | $12 |
| 3 | String lights (set) | $15 |
| 4 | Framed wall art (DIY hand-painted cardstock inside frame) | $25 |
| 5 | Moss vertical wall texture | $15 |
| 6 | Outdoor coffee table styling surface | $30 |
| 7 | Outdoor bar stools | $30 |
| Total | $152 | |
A cheaper variant is to downsize the wall moment: choose a smaller framed print and swap the second throw pillow for one extra blanket. You’ll still keep the evening glow from the string lights, which is the part that photographs best first.
What worked, what didn't (across the whole room)
This lineup works because it mimics the photo’s logic: warm string-light glow, one strong wall texture, and soft seating accents that read in dusk lighting. The only weak spot would be trying to over-decorate the patio surface instead of repeating one color family (green and wood-warm neutrals) across textiles and plants.
What worked
- String lights add warmth that flatters the wood slats and makes greenery look dimensional.
- The green throw blanket repeats the moss color so the patio feels cohesive, not random.
- Light beige pillows keep the seating from looking bare under evening shadows.
- Framed wall art gives the wood paneling a human focal point without permanent installs.
- Textural plant moments at eye level make the whole scene read “styled,” even with minimal objects.
- A coffee table surface prevents the foreground from feeling empty next to the flame feature.
What didn't
- Trying to replace wall texture with only small potted plants makes the wall feel emptier in photos.
- Too many table objects create clutter when the string lights already add visual movement.
- If the framed art is too busy, it fights with the moss texture instead of balancing it.
- Cool-toned light bulbs can make green plants look washed out and gray on tile.
What we'd skip if we did it again
Skip buying a matching “outdoor furniture set.” Even when pieces are similar, sets tend to look too uniform once lighting changes and you move everything. Use one or two core seating anchors, then add textiles and wall art that can travel. The photo’s strength is contrast—soft fabrics against hard tile and wood, not identical materials everywhere.
Skip adding extra wall décor beyond one framed piece. Here, the wood slats already read architectural, and the moss wall supplies the texture. If you layer in more framed items, the wall becomes busy and the evening glow loses focus. Pick one framed artwork moment that stays crisp in low light.
Skip cool-white string bulbs. Warm light is what makes the wood glow and keeps greens from looking flat. If string lights are the first investment, spend on quality bulbs and spacing, then stop—your throws and pillows should stay within the same warm-green palette so the patio reads designed, not accidental.
Frequently asked
How long does this kind of patio refresh take?
Most of the work is sourcing and styling, not construction. If the string lights are already in your garage, plan on about 2–4 hours for placement: drape the lights, set the throws and pillows, then add the framed wall art and one table moment. The DIY framed-card piece (cardstock abstract) is usually another 1–2 hours including drying time.
If I’m renting, what parts are truly move-friendly?
Stick to accessories: textiles (throws and pillows), plug-in lighting (string lights), wall décor that’s removed without leaving marks, and lightweight plant styling that can be packed. In this concept, the “anchors” are the green throw, beige pillows, and string lights—everything can be boxed the same day you move. Avoid anything that requires drilling or fixed mounting.
What if my patio is smaller than the photo?
Scale down by reducing the number of objects, not the color logic. Keep the string lights, choose one framed art moment, and use a single throw color family (green or warm neutral). Instead of multiple planters, concentrate texture in one vertical plant panel or one larger planter. For seating, add fewer pillows but keep the same beige base to maintain softness.
What if my patio is bigger?
Repeat the “texture and glow” strategy rather than adding random décor. Add a second grouping: another framed art moment on a different section of wall or a larger plant cluster that matches the moss texture. Keep lighting consistent across beams so the warm glow spreads evenly. With more space, stools and table styling matter more for making zones feel intentional.
Where should I shop differently for the same look?
For string lights and textiles, craft and home stores tend to have the best value per item. For framed art, look for simple frames at thrift stores and swap the insert with your DIY cardstock. For the green texture wall effect, search for moss-style vertical panels or planter inserts that can stand alone. The goal is items that are affordable and don’t require installation.
Biggest mistake for this kind of patio styling?
Overloading surfaces. When string lights are on, the room already has movement and glow, so too many objects on the table or too many wall pieces can make the space feel cluttered instead of cozy. Another common mistake is choosing cool-white lighting or mismatched greens—keep undertones warm so plants read fresh rather than gray.
More in Outdoor & Patio
7 renter-friendly patio swaps for a $400 glow
A warm, modern patio lounge refresh on a $400 budget using no-drill swaps that pack up for your next lease. The key result: instant evening…
A candle-and-wicker patio lounge setup for $400
Budget-friendly renter refresh for an outdoor patio lounge: add an outdoor rug, string lights, throw pillows, and a round wicker coffee tab…
7 no-drill updates for a courtyard seating nook
A courtyard seating nook makeover with seven move-friendly swaps built for shared housing, guided by a $600 budget. The look leans modern f…