- Best for
- Cozy outdoor lounge vibes
- Cost
- About $661 total
- Difficulty
- Easy (mainly textiles + labels)
- Renter-safe
- Yes (no-drill, packable layers)
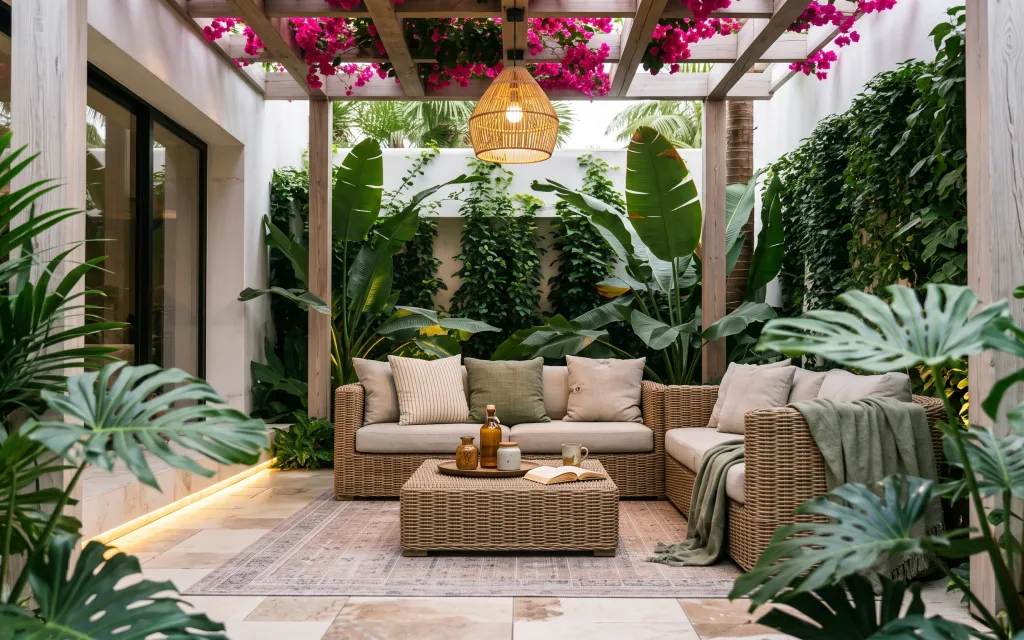
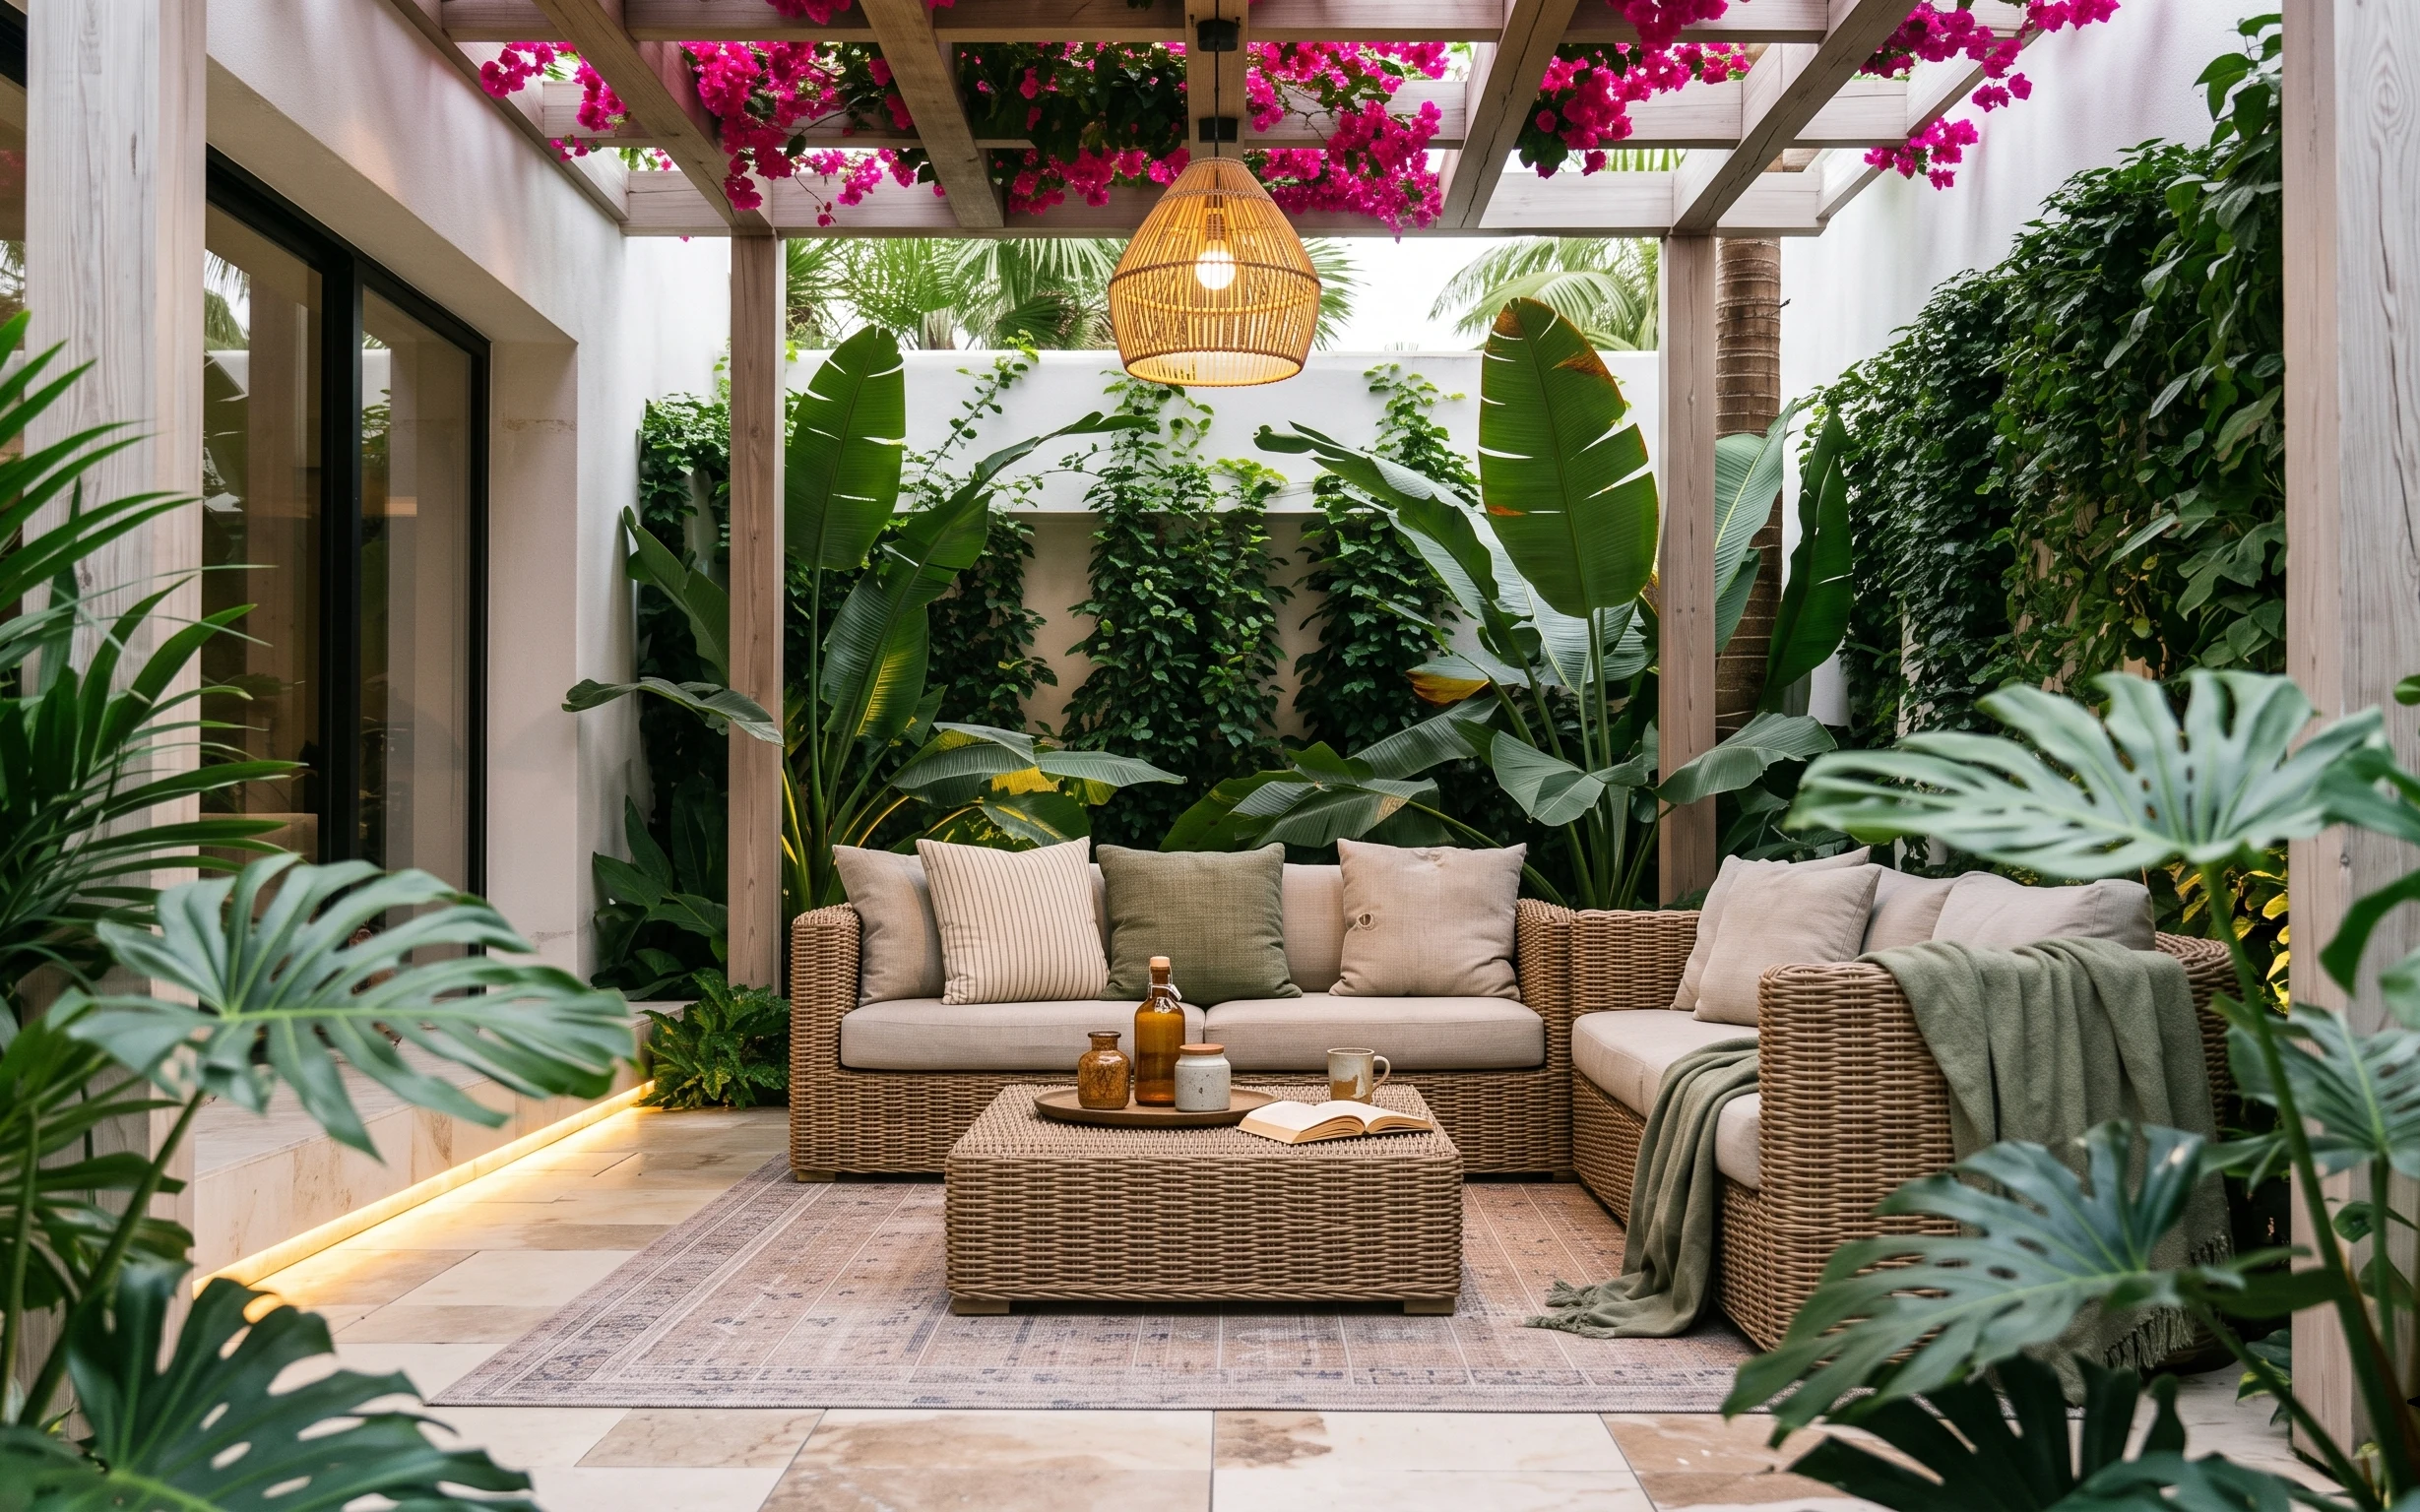
Why rattan-and-olive touches are the tropical patio lounge of 2026
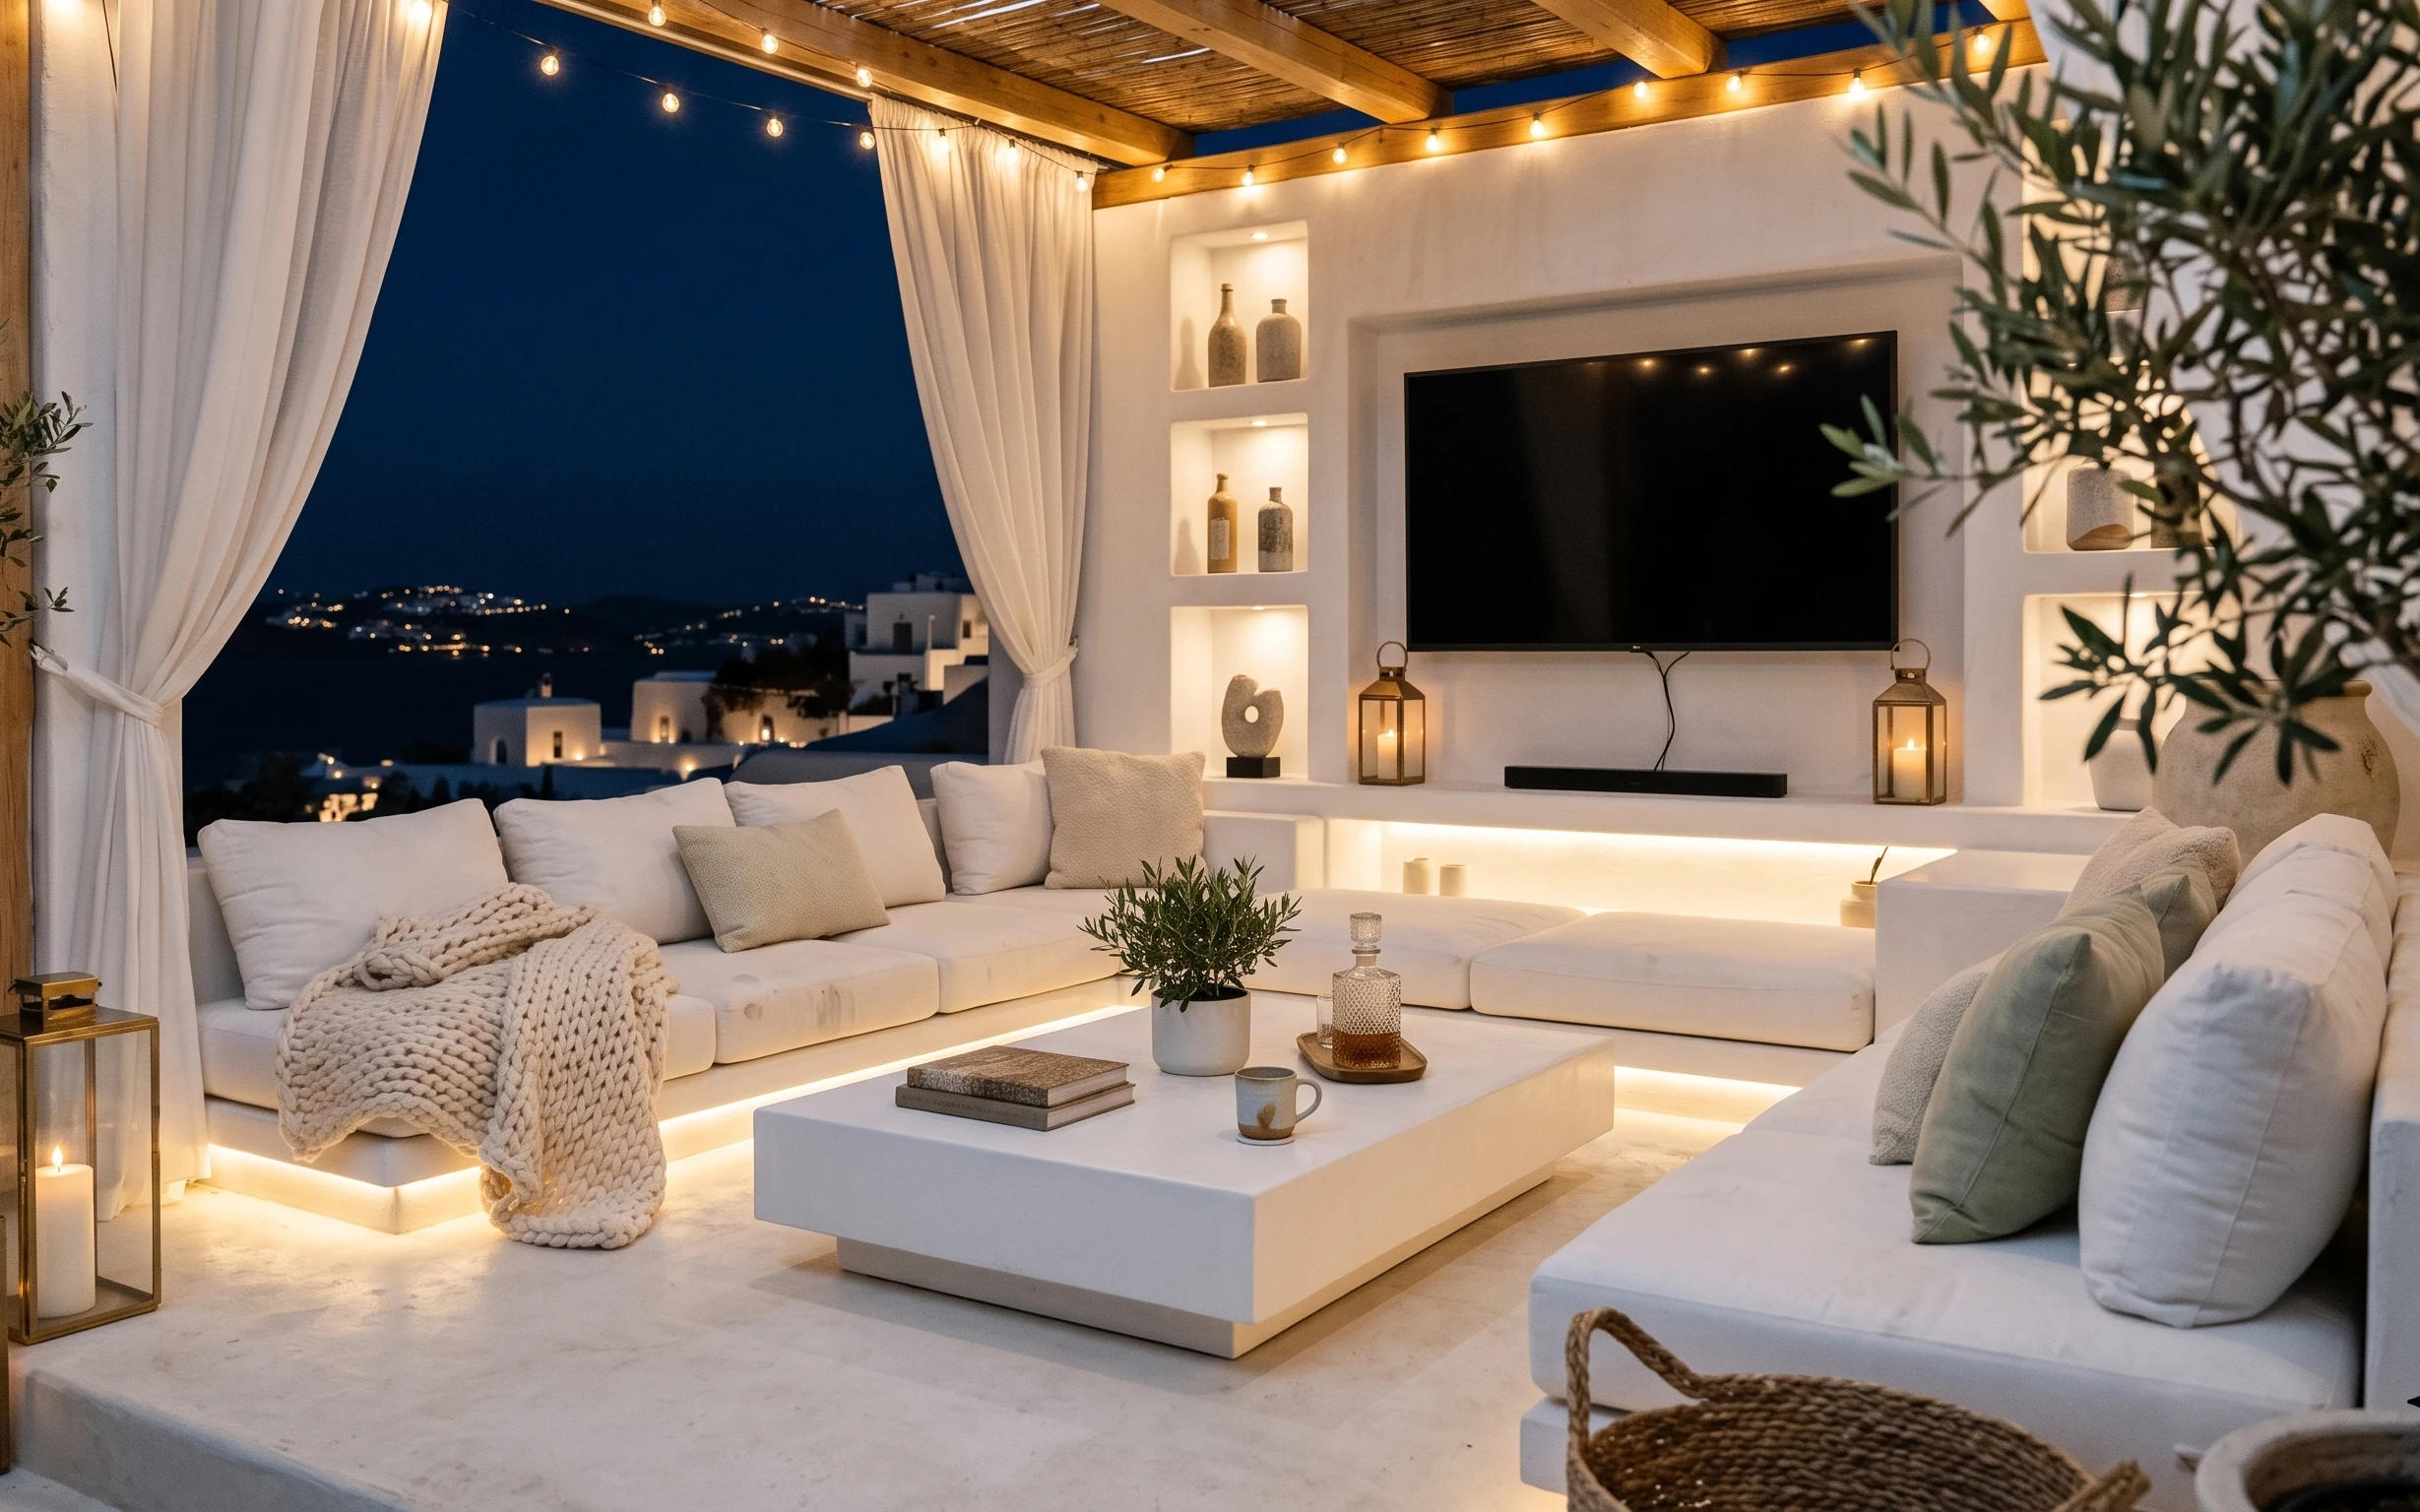
Borrow the structure first: a large patterned area rug, then a sofa dressed with pillow shapes that repeat (cream with one stripe, plus a deeper green note). The lighting matters too—this rattan pendant adds a warm amber center that keeps the greens from feeling cold, even with bright daylight. In your styling, mix textures the way the photo does: wicker with soft cotton, knits with smooth glass, and a draped throw that looks casual but not chaotic. And because everything here is swap-friendly, renters can build it without asking the landlord for changes.
I used to overthink “theme” and end up with too many matching prints. The turning point for me was noticing how the room keeps breathing: big leaf shapes fill the space, while the sofa textiles stay mostly neutral. That’s why this version leans on cream and olive as the consistent backdrop, then lets pink hanging blooms do the fun part. The goal isn’t to replicate the exact foliage—it’s to copy the balance of natural texture plus a few deliberate anchor pieces.
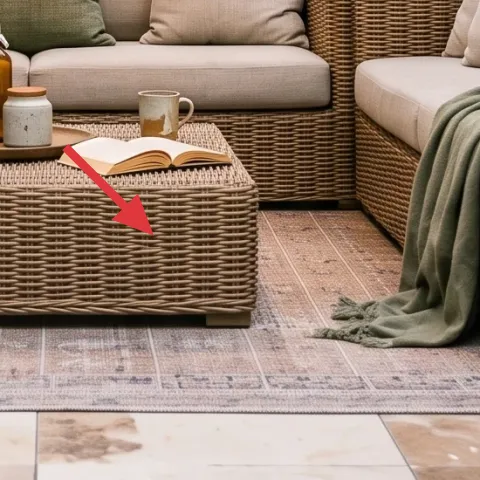
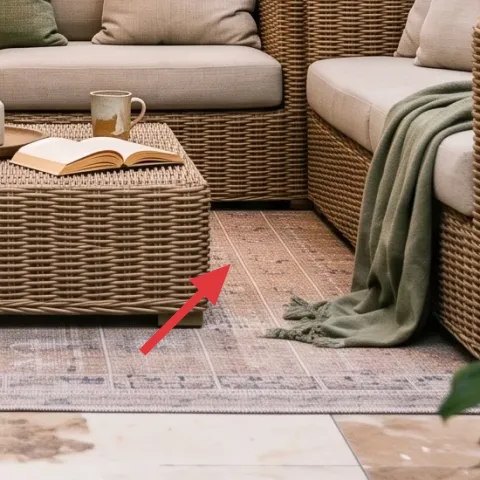
Layer 1 — area rug ($200) Patterned base that hides outdoor mess
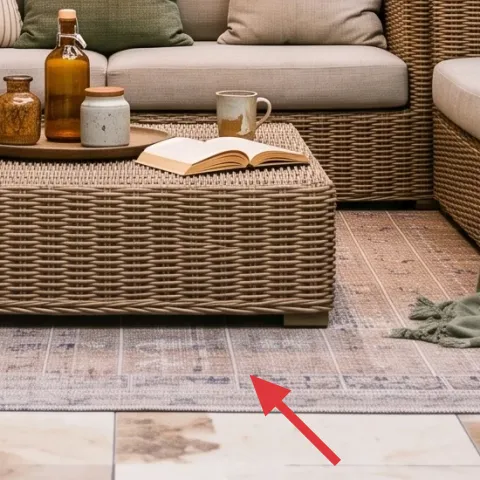
A grounded area rug is what makes the whole patio feel “designed” instead of temporary. In the photo, the rug’s muted pattern gives the floor a soft landing while still reading graphic from a distance. For a renter setup, pick a washable or outdoor-rated flatweave so the first splash, mud track, or sunscreen wipe won’t turn into a long-term problem. The trade-off is that a thinner rug shows wear faster than a plush one, but it also looks lighter and works better with wicker furniture. Anchor it slightly centered under the coffee table for the cleanest line.
Choose a rug that won’t fight your plants
With lots of green foliage and pink hanging blooms, a rug with a low-contrast palette keeps everything readable.
Layer 2 — outdoor sofa with cushions ($250) Cushion-first seating for big leaf energy

This sofa-and-cushion look is the real foundation: wicker structure plus soft seat depth reads naturally “resort” without needing sculptural furniture. The cushions stay in a creamy spectrum, while one or two pillows bring in a warmer olive note—so the greens outside feel cohesive instead of loud. If you’re renting, the smart move is choosing a sofa you can still carry with help: look for lightweight frames or pieces that fit through your door. The trade-off is that ultra-heavy outdoor furniture can’t be moved easily, so it’s harder to style each season. Keep the cushion colors neutral and let the plants do the color work.
Keep cushions mostly neutral
When the rest of the patio is botanical, neutral cushions prevent the room from feeling busy.
Layer 3 — rattan pendant lamp ($80) Warm rattan glow above the lounge zone
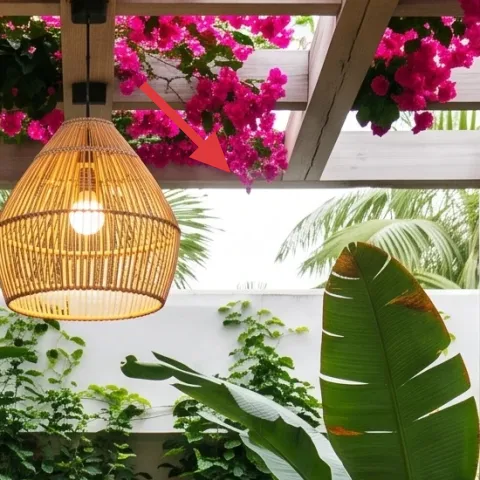
The rattan pendant lamp is doing quiet math: its woven shade diffuses light so it feels warm, not harsh, and it echoes the wicker furniture below. In daylight, it still acts like a texture feature—so your patio looks styled even before you light it. As a renter, go for a plug-in pendant or a plug-in style lantern that uses a cord you can unplug and remove later. The trade-off is that woven lamps can catch dust, so plan a quick wipe instead of expecting “low maintenance.” Position it so it visually hangs over the coffee table area, matching the lounge’s center line.
Don’t pick a shade that blocks too much light
If the shade is overly tight, the pendant can dim the patio when the sky goes cloudy—choose an open weave.
Layer 4 — throw blanket ($30) Olive drape that repeats the plant palette
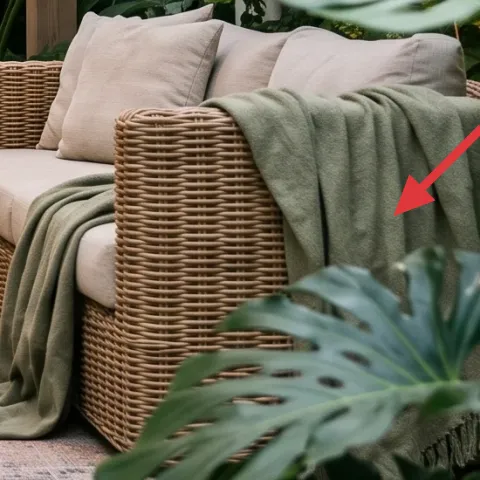
A draped throw blanket is the fastest way to make outdoor seating look lived-in. The photo’s olive tone pulls directly from the greens around it, while the knit texture makes the wicker feel softer. For renters, choose a throw you can rinse or spot-clean, since outdoor use means it will eventually collect sun and dust. The trade-off with knitted throws is that they can snag if there’s heavy foot traffic or pets, so keep it draped rather than stretched taught. Style it on the outside arm so it reads from the doorway and gives the sofa a “casual” silhouette.
Drape, don’t fold-flat
Let the blanket slump naturally so the texture looks intentional instead of folded laundry.
Layer 5 — decorative throw pillows ($36) Repeat cream, then add one olive stripe
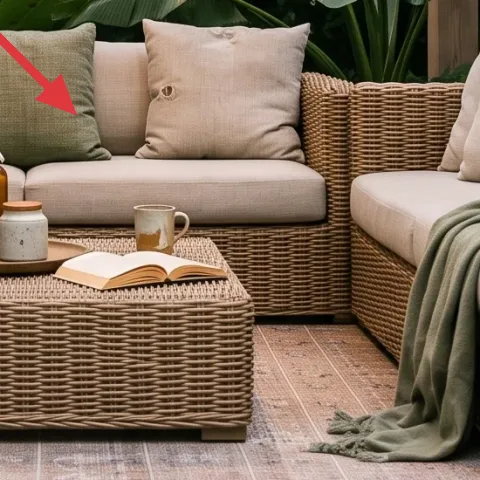
The pillow mix is simple but effective: cream for the base, one striped texture to add rhythm, and one deeper green pillow to echo the plants. Because the patio is already full of leaf shapes, the covers should lean toward solid or minimal pattern so the room stays calm. In a renter setup, pillow covers are the easiest layer to swap seasonally without replacing your entire seating set. The trade-off is that buying multiple covers adds up—so aim for 4 covers total, and match their sizes to your sofa cushions for a tailored look. Fluff them so they sit tall; flat pillows make even great furniture look tired.
Match pillow sizes to your cushion layout
Standard cover sizes that fit your cushions will keep the pattern placement from looking off.
Layer 6 — glass bottles and jars on coffee table ($20) Small glass styling that reads “collected”
On the coffee table, the photo uses glass vessels—bottles and jars—to create vertical interest without adding clutter. This is the moment that makes the patio feel finished: you’re not just hiding things, you’re styling everyday items like decor. Pick a simple trio—two taller pieces and one squat jar—so the group has shape even when you’re not hosting. For renters, the upside is that glass items are easy to pack and safe to move compared to large planters. The trade-off is that you’ll want a quick wipe before guests arrive; fingerprints show on clear glass. Keep lids and labels clean so the jars look intentional.
Group in odd numbers
Three pieces (instead of two) creates a steadier triangle shape that looks natural.
Layer 7 — apothecary jar labels ($45) DIY text that makes jars look designed
These labels are small, but they’re the detail that turns “a few jars” into a cohesive styling choice. The photo’s vessels sit on the coffee table like an apothecary vignette, and the labels visually unify everything—the bottles feel curated instead of random. Choose a simple vintage-style typeface and keep the wording short so it doesn’t overwhelm the glass. As a renter, you can print on removable label paper and stick them on for the lease period; when you move, peel them off cleanly. The trade-off is that label paper quality matters—cheap paper can curl, so prioritize a label stock that adheres smoothly to glass.
Make it instead of buying it
DIY apothecary jar labels using printable label paper and a vintage-style template so your coffee table jars match the look in the photo.
Materials
- Printable label paper sheets — A4 or Letter — craft store — $12
- Printable vintage-style label template (download or design) — 1 set — online — $8
- Fine-tip permanent marker (backup for touch-ups) — 1 — office supply — $6
- Alcohol wipes for glass prep — 10-count — drugstore — $9
- Spritz bottle with water (for positioning) — 1 — dollar store — $5
Steps
- Measure each jar’s label area using a flexible tape and note the height in inches or cm.
- Choose a template size that matches the jar’s curve so the label sits flat at the center.
- Print a test label sheet on plain paper first to confirm scale and alignment.
- Print on label paper and let the ink settle for a few minutes before handling.
- Wipe the jar glass with alcohol wipes so dust and oils don’t block adhesion.
- Lightly mist the label backing or jar surface (just enough for micro-positioning).
- Apply the label starting at the center and smooth outward to remove air bubbles.
- Press firmly along the edges and let the label set undisturbed for at least 10–15 minutes.
- If needed, use the marker for tiny touch-ups on abbreviations or dates.
- Keep one extra label per jar on hand in case a corner lifts.
Total DIY cost: $40 — saves about $5 over buying.
The cost, layer by layer
| Layer | Item | Cost |
|---|---|---|
| 1 | Area rug | $200 |
| 2 | Outdoor sofa with cushions | $250 |
| 3 | Rattan pendant lamp (plug-in style) | $80 |
| 4 | Throw blanket | $30 |
| 5 | Decorative throw pillows (covers) | $36 |
| 6 | Glass bottles and jars | $20 |
| 7 | Apothecary jar labels | $45 |
| Total | $661 | |
If you want a cheaper variant, swap the sofa for individual outdoor cushion sets on a smaller loveseat, choose a simpler low-contrast rug, and keep the styling to three labeled jars plus fewer pillow covers.
What worked, what didn't (across the whole room)
The best parts of this patio lounge are the big, repeatable anchors: the rug under the seating and the warm rattan pendant above it. The foliage does the drama, while the textiles and coffee-table styling keep it cohesive. When anything starts to look “random,” it’s usually because the neutral base (cream/olive) didn’t stay consistent.
What worked
- The patterned area rug creates a clear lounging zone even with lots of greenery and movement.
- Neutral cream cushions keep pink flowers and leaf shapes from overwhelming the seating.
- The rattan pendant adds warm diffusion so the patio feels cozy even in bright daylight.
- The olive throw repeats the plant tones, making the seating look naturally integrated.
- Odd-number glass pieces on the coffee table read intentional from several angles.
- Apothecary-style labels unify bottles and jars into one curated vignette.
What didn't
- Too many pillow patterns at once can compete with the leaf textures and feel visually loud.
- Choosing a dense, dark pendant shade can make the lounge feel dim when clouds roll in.
- Using a high-pile rug outdoors can trap debris and look worn faster in regular use.
- Clear glass with no label or grouping can look like storage instead of decor.
What we'd skip if we did it again
Skip buying a second rug “to layer” unless you have clear spacing. On a patio packed with big leaf shapes, two patterns often clash. A single anchored rug with a low-contrast palette does the zoning job without making the room feel busy.
Skip heavy, non-movable furniture for a renter refresh. You want pieces you can carry, re-center, and store when seasons change. Lightweight cushions plus a simpler frame give you the same comfort look with fewer headaches during moves.
Skip overly tiny décor. If the coffee table styling is just one jar and nothing else, it reads incomplete. Go for a trio and add labels, so the small details read as a set from a normal standing distance.
Frequently asked
How long does this patio refresh usually take?
Most of the time is in layout—centering the rug, fluffing cushions, and grouping the coffee-table jars. Plan about 2–3 hours for the first pass. If you DIY the apothecary labels, add another 30–60 minutes for printing, prep, and smoothing the labels onto the glass.
What’s the most renter-friendly way to handle the lighting part?
Look for a plug-in pendant or a corded hanging style that unplugs easily when you move. Avoid anything that requires hardwiring or drilling into beams. If you can’t hang it from the ceiling, swap to a tall plug-in lamp placed near the seating so you still get that warm, layered light effect.
If my patio is smaller, what should I scale down first?
Start with the rug size. A smaller rug is fine as long as it still sits under the front legs of the seating, so the lounge reads as one zone. Then reduce pillow count from 4–6 down to 2–3 covers, keeping the same cream base and one olive accent for cohesion.
Can I do this if my outdoor space doesn’t have a lot of existing plants?
Yes. Use fewer, larger plant shapes instead of many small ones. A single tall leafy plant near one corner plus a medium plant on the opposite side mimics the “frames around the sofa” effect. Then let the labeled jars and warm rattan pendant provide the curated finishing details.
Where should I shop to recreate this look on a budget?
For the big anchors, check discount home retailers and marketplace listings for outdoor sofas and rugs. For the label DIY, any office supply store works—focus on printable label paper. For textures like throws and pillow covers, look for indoor-outdoor knit and neutral tones that can take sun and quick cleaning.
What’s the biggest mistake to avoid on a tropical patio lounge?
Don’t add too many different patterns. When the space already has bold leaf shapes and hanging pink flowers, busy textiles can make the seating area feel chaotic. Keep pillows mostly cream with one textured stripe or one deeper olive piece, and choose a rug with a low-contrast palette.
More in Outdoor & Patio
How to style a tropical patio lounge for under $700
A renter-friendly tropical patio lounge refresh with 7 swap-in layers—rug, cushions, warm rattan light, and easy styling for a lush look. B…

Warm outdoor-lounge glow: $500 of renter-friendly patio upgrades
An outdoor lounge refresh for shared housing: add a jute rug, leaf-print pillows, string lights, and candle lanterns. This $500 plan is ful…
7 coastal-friendly upgrades for a patio lounge
A white-and-brass patio lounge that reads like a resort doesn’t need a full rebuild. Here are 7 upgrades you can do over a weekend refresh—…