- Square footage
- Outdoor lounge corners ~80–120 sq ft
- Cost
- $500 ceiling
- Difficulty
- Easy (all soft goods + no-drill lighting)
- Renter-safe
- Yes (moveable swaps)
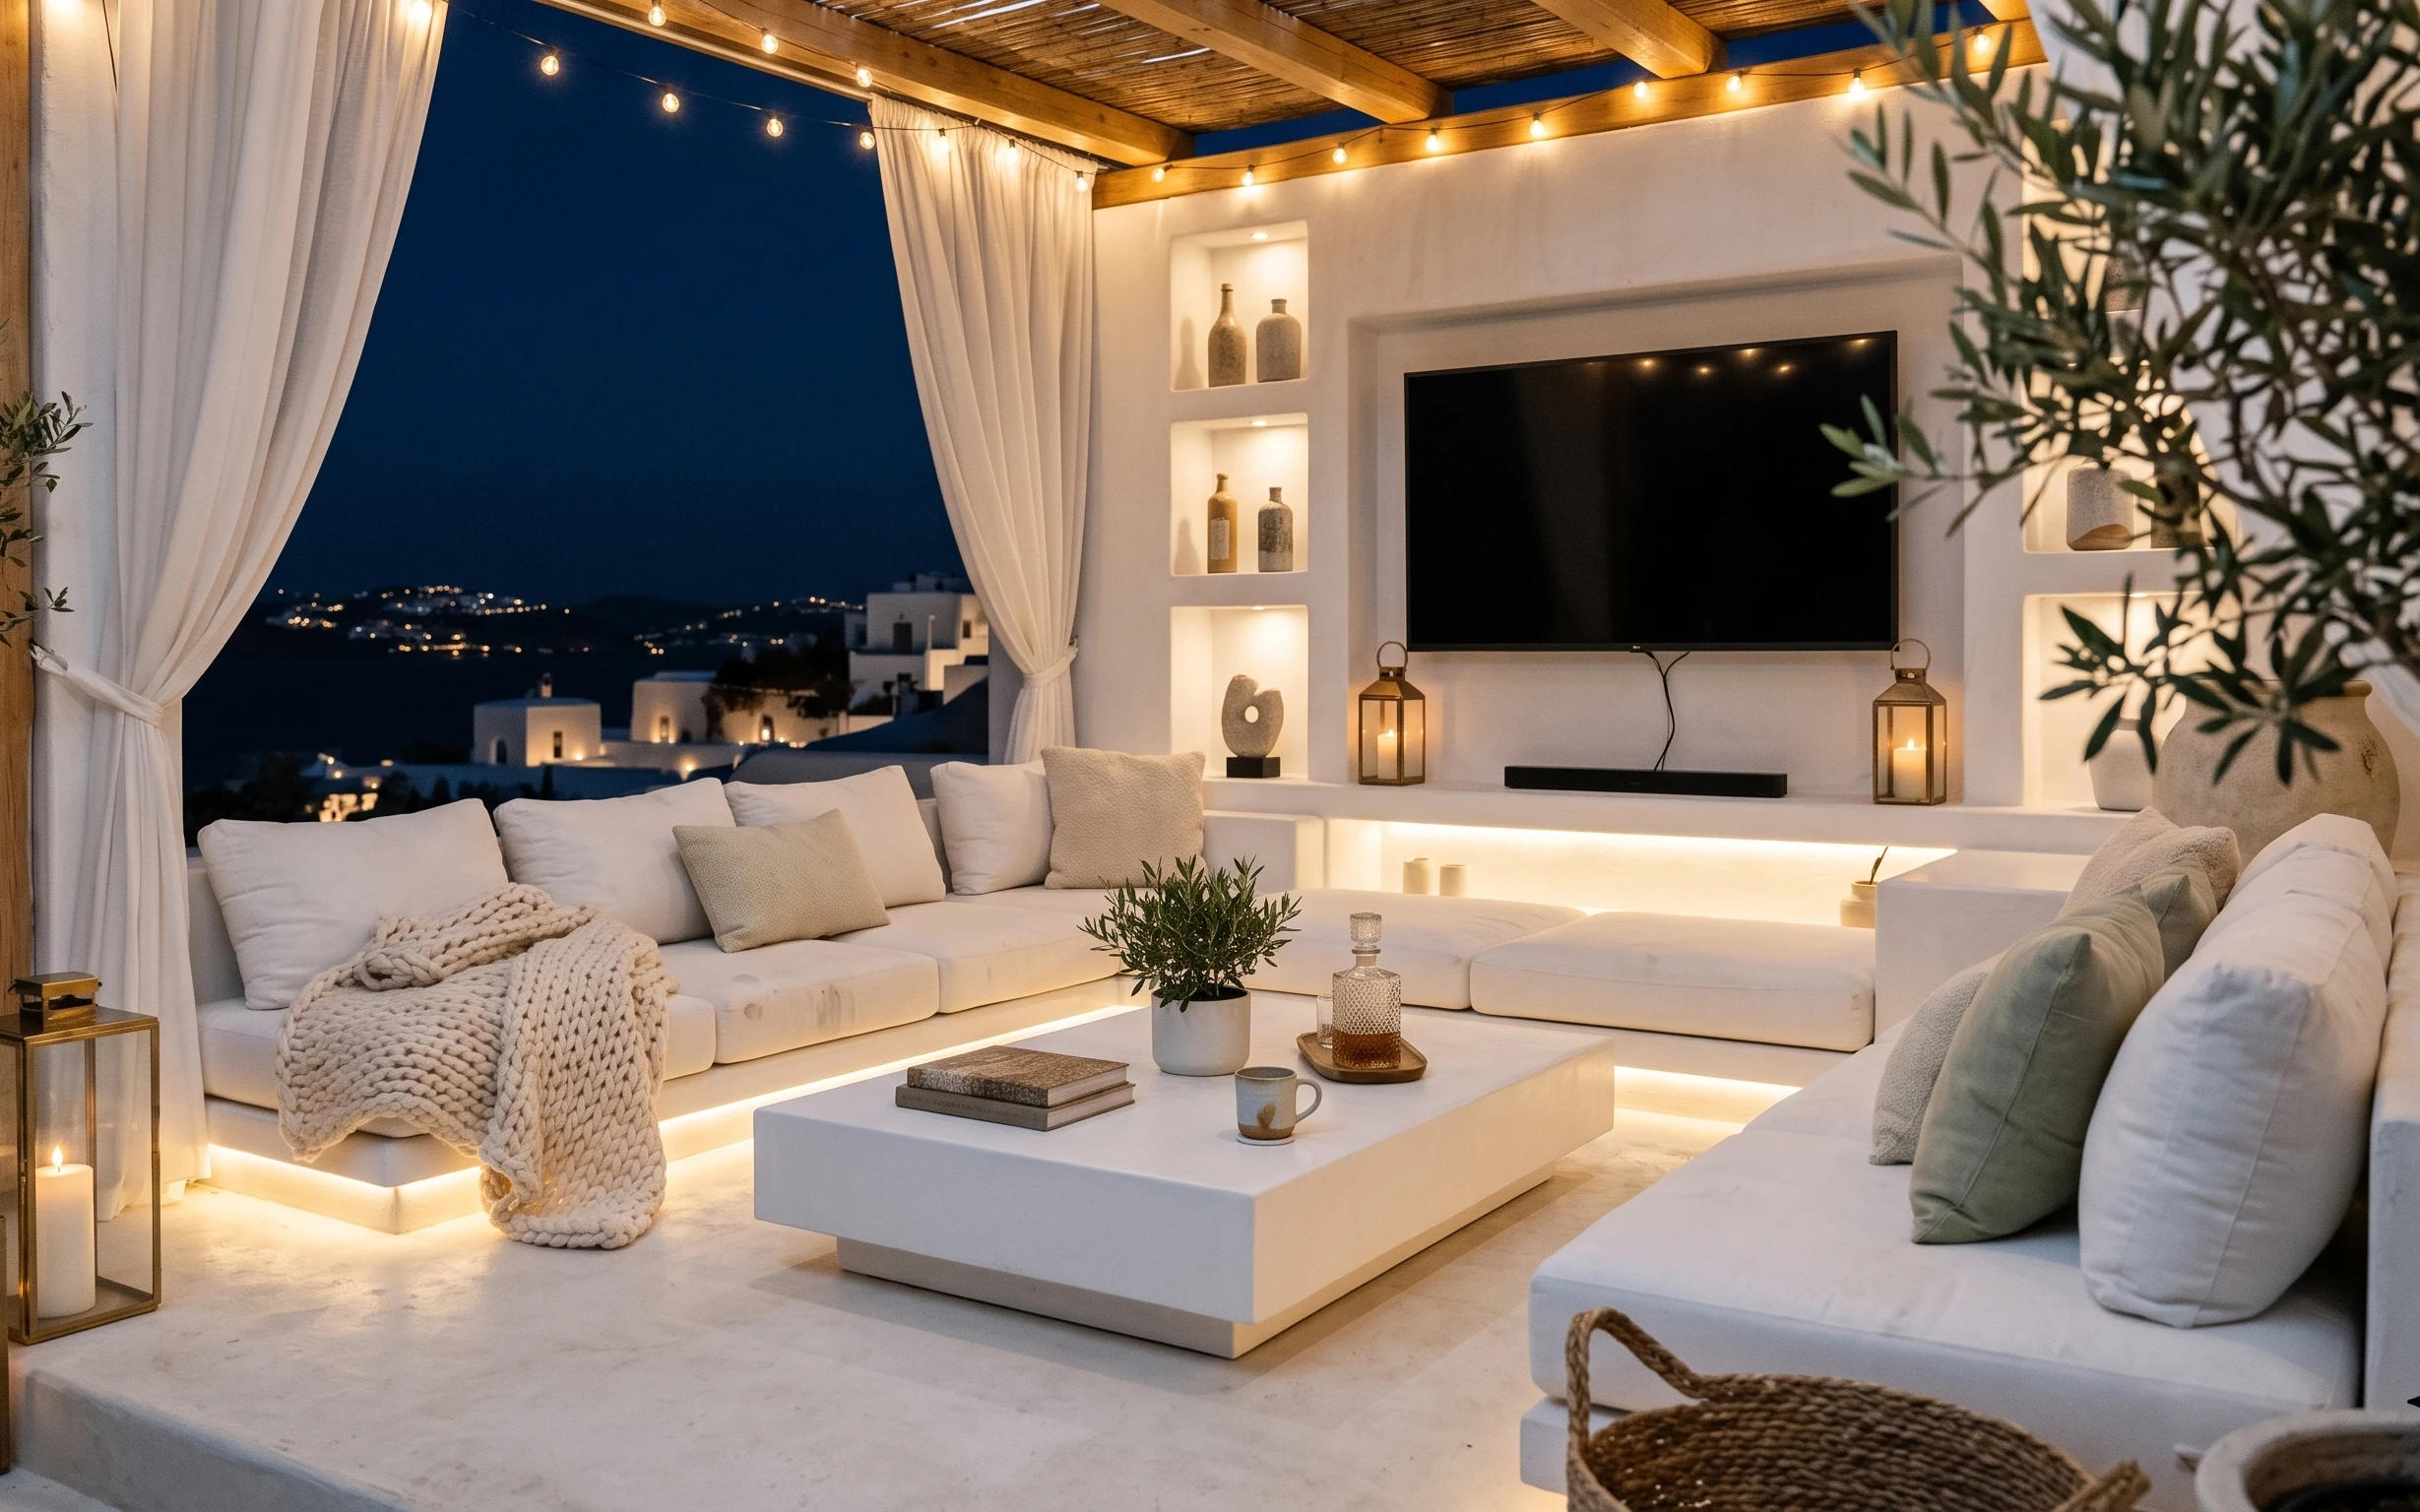
Why warm terracotta lantern patio is the outdoor lounge of 2026
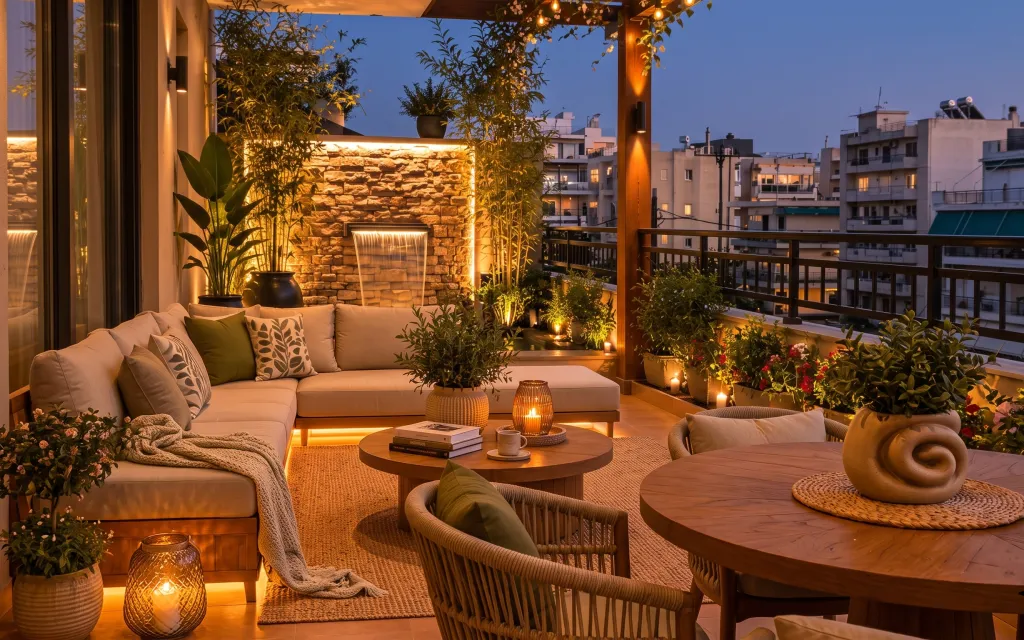
On this patio, the exposed stone backdrop does the heavy lifting, but the softness comes from textiles and the repeating “golden” light. You can see that in the jute rug texture underfoot, the cream throw draped over the sofa arm, and the leaf-print plus olive cushions that read layered, not matchy. The trick for shared-housing life is choosing swaps you can pack: pillow covers, a rug you can roll, and light strings that clip or hook without touching the building. This style works because it’s a palette (warm beige, olive, terracotta) you can rebuild anywhere.
I once overbuilt an outdoor setup by buying a decorative planter I couldn’t actually move between seasons—by the time I moved apartments, it was awkward and scratched up. What changed my mind was treating planters and candles like “styling containers,” not permanent decor. Now I buy the format that travels (lightweight pots, rollable textiles, plug-in lighting or hook-based strings) and let the vibe carry the day—especially in evenings when string lights and lantern candles make everything feel intentional.
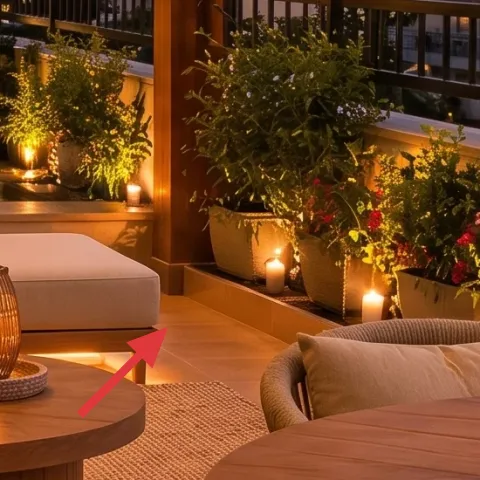
Layer 1 — jute area rug ($200) Texture underfoot, moveable and forgiving
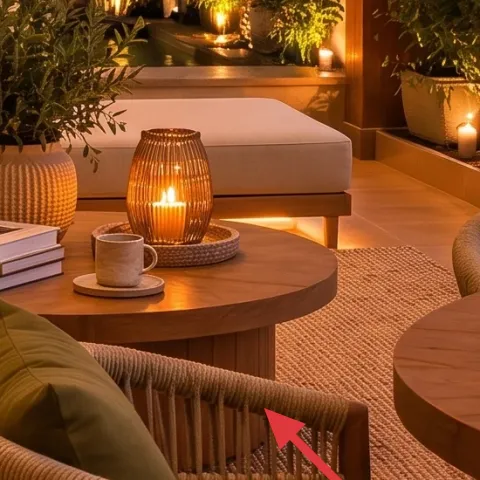
A jute area rug is the foundation here: it adds that straw-and-warmth texture that looks good against stone, wood, and greenery. In an outdoor lounge, it also helps visually anchor the seating so the patio doesn’t feel like a collection of separate pieces. The trade-off is shedding—jute fibers can loosen at first—so this is one of those upgrades where you accept a short break-in period. Buying a full 8×10 (or close) size also matters more than people think; it frames the sofa and coffee table area so the lighting looks “built in,” not accidental.
Use rug tape or a thin non-slip pad
For safer footing outdoors, pair the jute rug with an outdoor-rated non-slip liner to keep it from creeping.
Layer 2 — leaf-print throw pillows ($36) One botanical pattern, repeated
These leaf-print throw pillows give the whole lounge a graphic rhythm without needing wall art. The specific move here is mixing a botanical pattern (leaf) with a solid olive cushion so you get contrast while still staying in the same warm family of colors. The trade-off is that prints can feel busy if you go too many; sticking to two or three cushion covers keeps the look airy. Choose covers that zip or cover the whole front so you can pack just the soft goods when the next lease starts, rather than wrestling with a bunch of bulky inserts.
Pick covers, not permanent stuffing
Cover-based styling packs flat and makes it easy to swap in different patterns later.
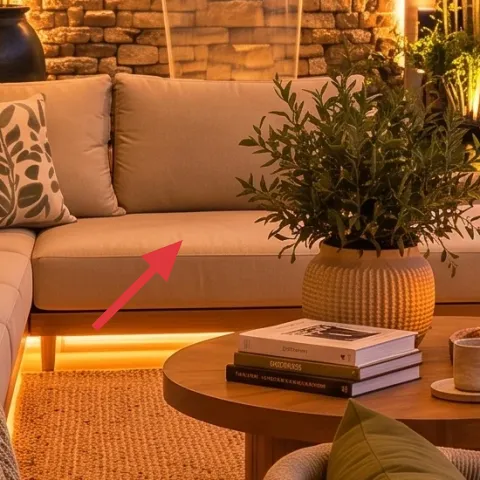
Layer 3 — cream throw blanket ($45) Draped softness to soften hard surfaces
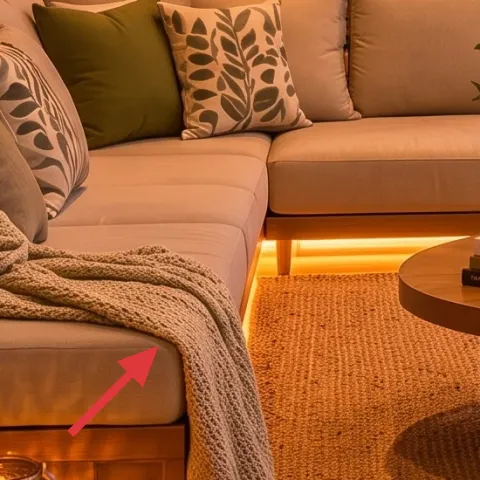
The cream throw blanket is what turns the patio from “furniture on tile” into a place that feels lived-in. Its weight and neutral color matter: it reads cozy without fighting the stone wall or the terracotta tones in the planters and candles. The trade-off is maintenance—cream shows dust faster than darker throws—so it’s worth buying one you can shake out quickly. I like keeping one draped over the sofa arm and storing the rest in a labeled bag when you travel or move in the middle of the semester.
Avoid throws that can’t survive packing
If the fabric is too delicate, it wrinkles and pills; choose a knit or woven that stays forgiving after vacuuming and rolling.
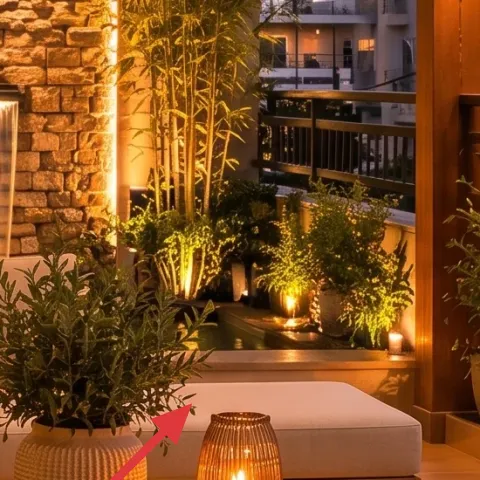
Layer 4 — string lights set ($15) Instant evening glow without installation
String lights are the simplest “no-drill” mood upgrade in this scene. The way they arc along the top makes the whole outdoor lounge feel framed, and the warm bulbs echo the amber candles—so everything reads cohesive even when you’re improvising. The trade-off is that string lights can look cluttered if they’re tangled or too sparse, so spacing and layering matter. For shared housing, pick a plug-in string and route it with existing railings or lightweight hooks you can remove cleanly—then pack the lights as a coil, not as a knot.
Layer warm sources at two heights
Keep string lights high and candles low so the glow fills the seating area, not just the ceiling line.
Layer 5 — glass lantern candles ($30) Low light that photographs like “design”
Glass lantern candles are a key detail in the image: they create those small, warm points of light across the floor line near the seating. That’s what makes the patio feel intentional at dusk, because the light spills onto rugs and planter edges. The trade-off is safety and scent management—candles mean you have to watch them more than you would with a bulb. If you use real candles, keep them in stable holders on level surfaces and trim wicks; if you switch to flameless later, keep the same glass holder look so the style remains consistent.
Cluster for depth, not a single line
A staggered cluster looks richer than spacing everything evenly.
Layer 6 — large ceramic pot ($40) A warm “anchor” near the dining edge
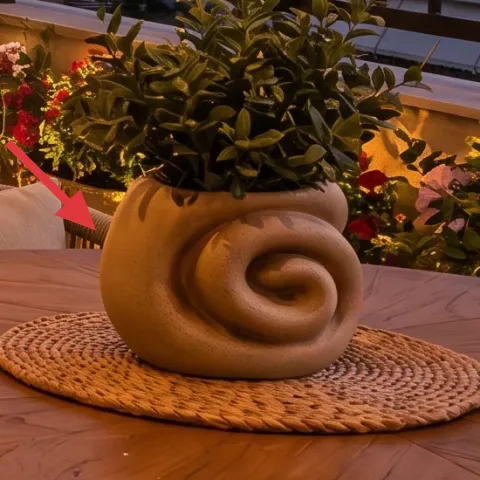
The large ceramic pot on the right is a visual anchor: it brings scale and weight so the plants don’t feel like small accessories. That matters outdoors, where tall greenery can otherwise float and disappear against the balcony view. The trade-off is that ceramics are heavier than plastic planters, so you’ll want to choose one with manageable weight or treat it as a “swap-on-move” item you can protect well. In a shared-housing move, I always wrap ceramics like breakables and keep them in a dedicated moving box labeled “fragile planters” to avoid rush damage.
Use a removable inner pot
An inner liner makes it easier to refresh soil while keeping the outer pot as the stable design piece.
Layer 7 — painted terracotta planter set ($55) Moveable color that matches the candle glow
These painted terracotta planters echo the warmth already in the scene, especially near the stone wall and candlelight. The reason this works is color continuity: terracotta reads like “baked” light, so it pairs naturally with warm strings and amber glass. As a shared-housing setup, the payoff is that planters are both styling and function—you can repot, re-home, or simply swap what’s planted next semester. The trade-off is that paint jobs need a little care, but you’re painting something you can fully pack into a small box.
Make it instead of buying it
This painted terracotta planter set duplicates the warm clay-and-gold look using simple acrylic paint, so you get moveable color for less.
Materials
- Terracotta planters — 2 small pots — craft store — $20
- Acrylic paint (warm terracotta + light sand) — 2 colors — art store — $10
- Foam sponge brush — 1 — craft store — $6
- Painter’s tape — 1 roll — hardware store — $4
- Drop cloth or paper grocery bags — 1 pack — home goods — $5
Steps
- Wash and dry the terracotta pots so the paint grabs evenly.
- Tape off any stripes or bands you want to keep crisp.
- Use the sponge brush to dab a base coat in warm terracotta.
- Add lighter sand tones with a lighter hand for a sun-washed effect.
- Let everything dry fully, then remove the tape carefully.
- Touch up thin spots and leave to dry before packing or displaying.
Total DIY cost: $45 — saves about $10 over buying.
The cost, layer by layer
| Layer | Item | Cost |
|---|---|---|
| 1 | Jute area rug (8×10) | $200 |
| 2 | Leaf-print throw pillow covers | $36 |
| 3 | Cream throw blanket | $45 |
| 4 | String lights set | $15 |
| 5 | Glass lantern candles | $30 |
| 6 | Large ceramic pot | $40 |
| 7 | Painted terracotta planter set (DIY) | $55 |
| Total | $421 | |
If you want a cheaper version, drop the rug size first (or choose a smaller jute rug) and swap to fewer candle lanterns. Keep the string lights and one oversized planter—those three details do most of the “designed” work.
What worked, what didn't (across the whole room)
The warm, layered glow works because the scene repeats a tight palette (beige, olive, terracotta) across textiles, light, and plant containers. The biggest risk is outdoor practicality: light fabrics and candles can be fussy, but the look is still easy to maintain with the right packing habits.
What worked
- The jute rug grounds the seating so the patio reads like one lounge instead of separate pieces.
- Leaf-print pillows add pattern without requiring any wall decor that won’t move with you.
- String lights at the top make the evening look intentional and photogenic.
- Glass lantern candles create layered low light that flatters both planters and textiles.
- Terracotta-toned planters keep the palette consistent with the warm light.
What didn't
- Cream throws show dust faster outdoors, so they need more frequent shakes.
- Candles require close supervision and stable placement on tile.
- Large ceramics are heavier to move, so you need extra packing protection.
- Too many patterned pillows can blur the botanical theme into visual noise.
What we'd skip if we did it again
Skip “one perfect planter” purchases that are too heavy or too fragile. In shared housing, it’s easier to keep a consistent look by owning lighter planters you can pack safely.
Skip candle setups that don’t match the glass-holder aesthetic. If you change the look of the holders, the warm glow won’t read the same, even if the candles are the same temperature.
Skip going bigger on the rug before you finalize your seating footprint. The rug frames the whole scene, so getting the size right first prevents a lopsided look that’s hard to fix later.
Frequently asked
How long does this outdoor lounge refresh take?
Most of the updates come from soft goods and portable decor, so the quick part is fast: rug placement, pillow styling, and setting the string lights can be done in under an hour. The slower portion is arrangement—candle spacing and planter placement—plus any DIY painting time. If you’re doing the painted terracotta planter set, plan an extra half-day for drying before you put the planters back into rotation.
Is this renter-friendly for shared housing and frequent moves?
Yes, because the “layers” are all things you can box and carry: a rolled jute rug, zip-on pillow covers, a throw blanket, plug-in string lights, and ceramic/terracotta containers. The goal is that nothing requires drilling into railings or fixing to the building. Even if you leave the largest furniture pieces behind, these details still recreate the same warm, botanical evening vibe.
What if my outdoor space is smaller than the photo?
Scale down without changing the strategy. Use fewer candle lanterns (a tighter cluster near one seating corner), pick a smaller jute rug, and keep only one statement planter near the seating edge. The leaf-print pillows can stay, because pattern is easy to repeat. The string lights are the one piece I wouldn’t cut first—keeping warm lighting high makes small patios feel intentional.
What if I have a bigger patio and want more impact?
Keep the palette consistent and increase repetition. Add a second throw blanket in the same cream tone, extend the string lights farther across the top, and spread planters into two “islands” instead of one. You can also add a second cluster of glass lantern candles, but keep them at floor level so the scene reads layered rather than floating.
Where should I shop to get the look without overspending?
For jute rugs and basic throws, look for home goods retailers with 8×10 options or thriftable rug listings that can be rolled safely. Pillow covers and patterned textiles are usually easiest to find at fabric-focused stores or online marketplaces. For planters, garden centers and discount home stores often have terracotta in small sizes that are perfect for DIY painting.
What’s the biggest mistake people make with this patio style?
Overmixing patterns too early. The botanical leaf pillows and warm solids work because they repeat the same color temperature—beige, olive, and terracotta. If you add additional prints, keep them smaller in number and make sure the colors still match the candle glow. Another common miss is choosing string lights that are too cool-toned; warm bulbs are what make the stone and greenery look golden.
More in Outdoor & Patio

Warm outdoor-lounge glow: $500 of renter-friendly patio upgrades
An outdoor lounge refresh for shared housing: add a jute rug, leaf-print pillows, string lights, and candle lanterns. This $500 plan is ful…
7 coastal-friendly upgrades for a patio lounge
A white-and-brass patio lounge that reads like a resort doesn’t need a full rebuild. Here are 7 upgrades you can do over a weekend refresh—…
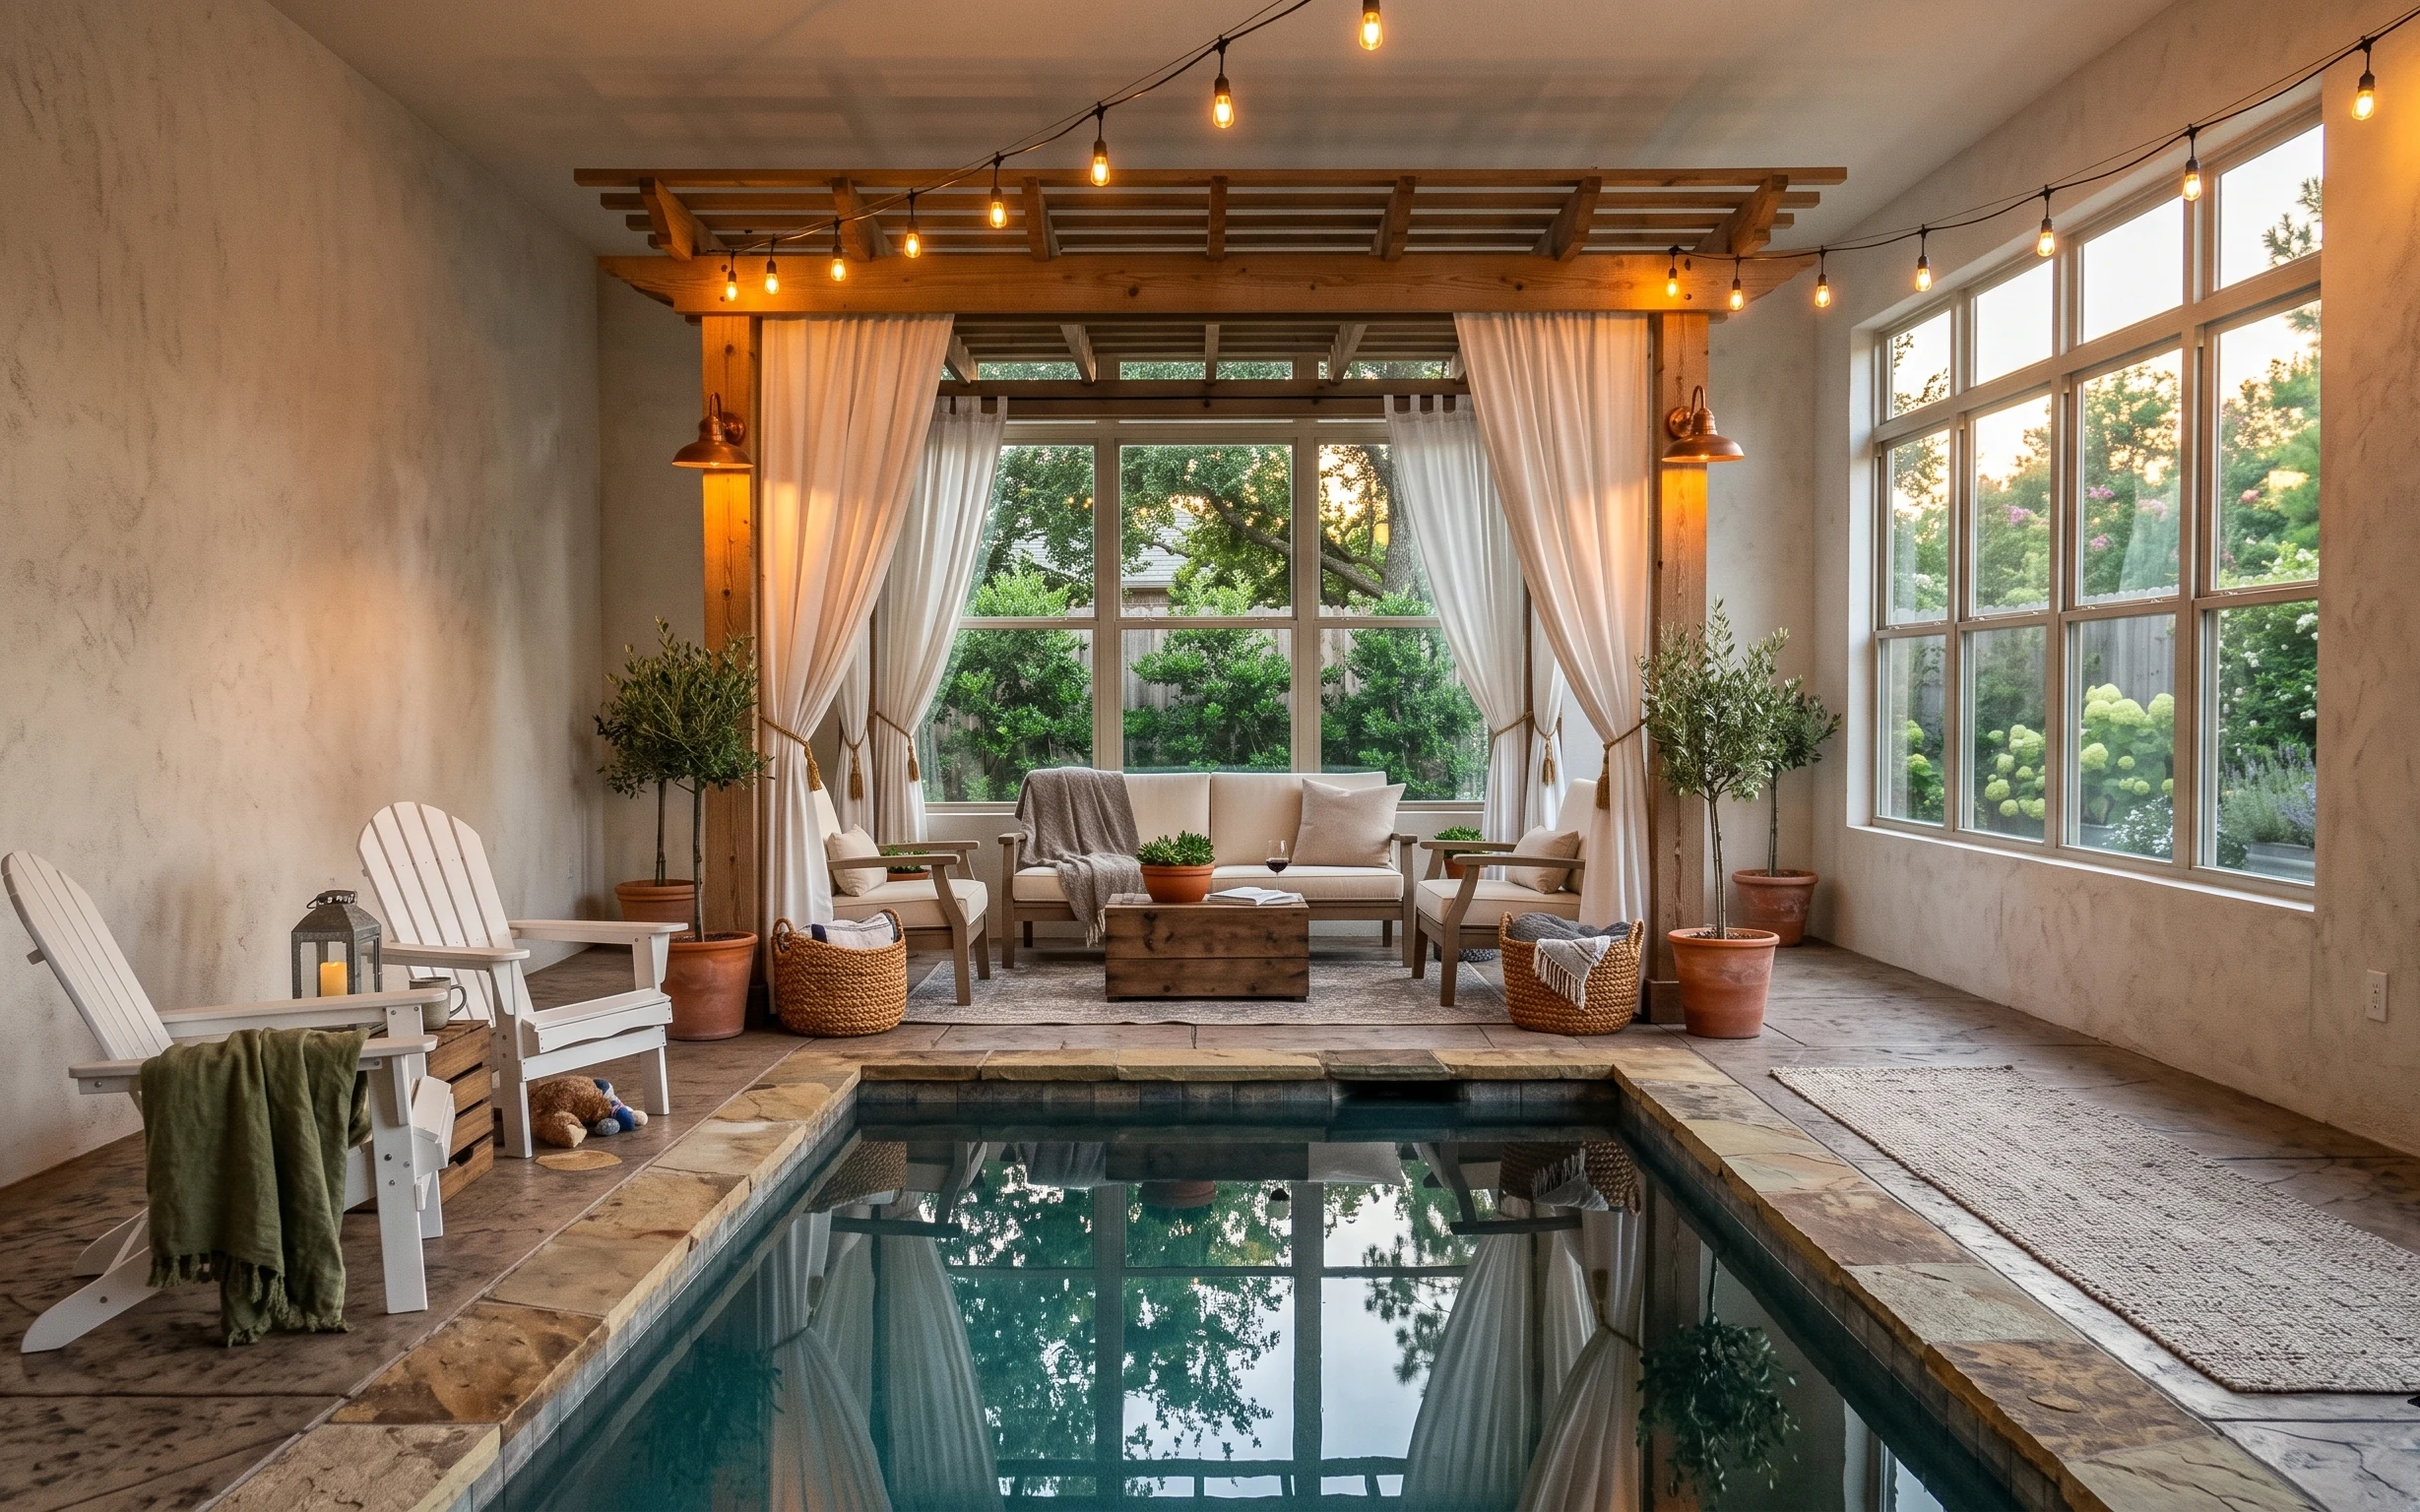
Warm curtain-and-light string refresh for a $800 poolside sitting room
A $800 weekend plan to make a poolside sitting room feel cohesive: swap in a large rug, add curtain panels, and style the sofa with warm li…