
- Best for
- Natural dining styling in a rental
- Cost
- About $500 for 7 layers
- Difficulty
- Moderate (mostly styling + one small DIY)
- Time
- 2–4 hours total
Why warm wood-and-rattan styling is the dining table nook of 2026
Look at how the room reads in layers: warm wood furniture, stone-gray walls, and soft cream textiles. Even the lighting stays gentle—those woven shades and a fabric-shaded plug-in lamp keep shadows from getting harsh. On the table, the folded linen cloth adds texture without pretending to be a full table runner set. This is a look that comes straight from modern coastal and Japandi styling, where “natural” means tactile: linen, ceramic, and matte art. For renters, the trick is choosing swap-able elements, not permanent wall or fixture changes.
I used to overthink prints and end up with art that didn’t match the room’s warmth. The first time I leaned into a simple line drawing and paired it with linen and ceramic, the whole dining zone looked calmer instantly. I also caught myself buying a “perfect” candle holder that was too tall—then it blocked the sightline across the table. In this version, the small ceramic candle holder and the tray keep everything at a comfortable, glanceable height.
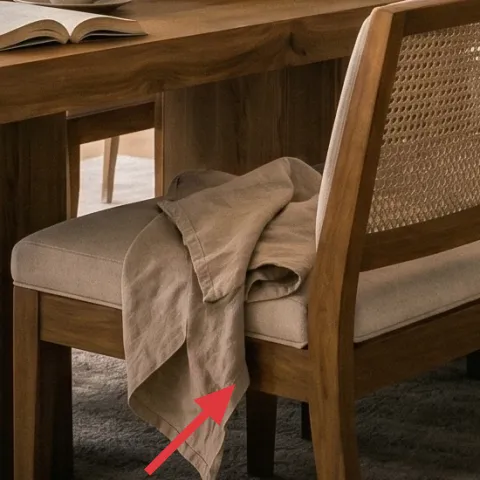
Layer 1 — Folded linen cloth on table ($35) texture that doesn’t fight the wood
A folded linen cloth on the dining table is the quickest way to add that airy, lived-in softness you see here, especially against warm wood. Choose a cream or oatmeal linen with a visible weave—matte texture shows up in daylight and doesn’t look shiny under lamp glow. It works because it’s a “single plane” styling layer: it frames the table without making the whole surface feel busy like a patterned runner would. The trade-off is you’ll re-fold it when the table gets cleared, but that’s also what makes it very lease-end friendly.
Layer by texture, not by pattern
Keep the cloth solid and let the room’s pattern come from the woven lamp shades and the line drawing.
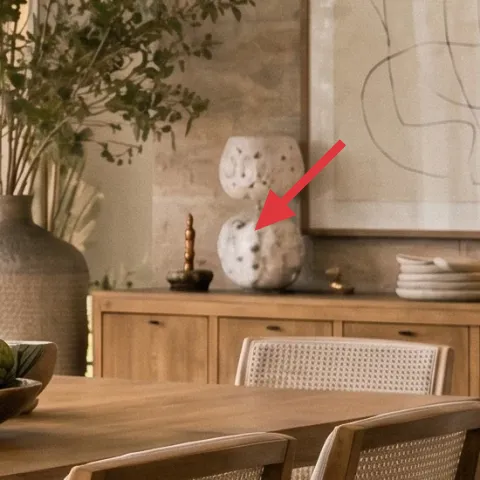
Layer 2 — Ceramic candle holder ($25) a small glow with clean lines
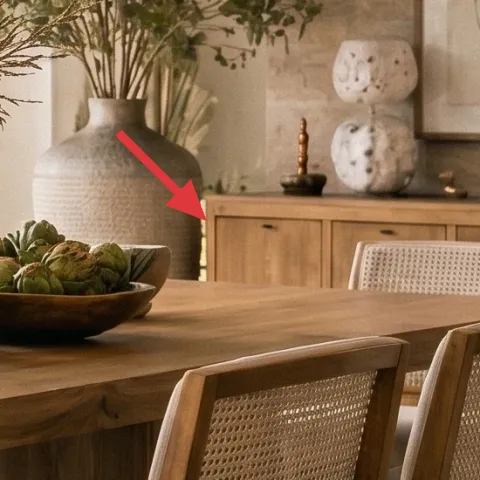
This ceramic candle holder gives you the warm, still-life feeling of the photo without needing a complicated centerpiece. The best part is scale: it sits comfortably on the sideboard area and reads as “decor” even when unlit. Go for a neutral stone or soft white ceramic finish so it matches the stone-gray wall and cream tones from the lamp fabric shade. A metal holder can look too sharp against the wood; ceramic keeps the whole palette quieter. The compromise is scent—if it’s a scented candle, it can compete with food aromas, so keep it subtle.
Use candle height to protect the sightline
Keep the holder low enough that chairs across the table still feel connected.
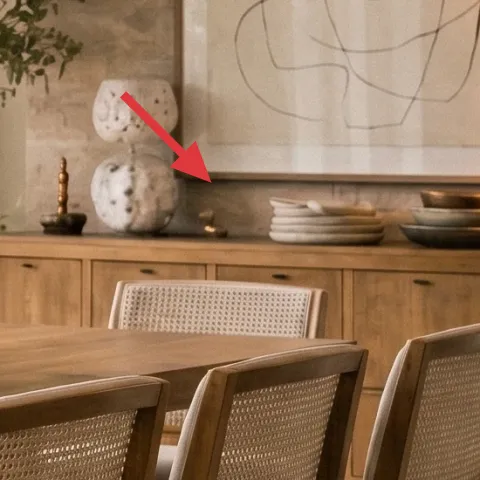
Layer 3 — Decorative tray ($35) a tidy “landing pad” for small objects
A decorative tray is what makes scattered styling look intentional, especially on a sideboard. In the hero, the grouping of small pieces feels controlled—like everything belongs to one surface. Pick a tray with a natural finish (light wood, cane, or stone-like ceramic) so it doesn’t steal attention from the lamp and framed art. A tray also helps when you’re moving items from room to room during gatherings. The trade-off: you’ll choose fewer objects than you think—one vase, one small candle holder, maybe stacked plates—so the tray actually does its job.
Anchor the tray with one “hero” object
Make the tray support the vase, then fill around it with only one or two small pieces.
Layer 4 — Framed abstract line drawing ($80) renter-safe art that looks custom

A framed abstract line drawing is doing more work here than people expect—it’s the “gallery edit” that tells the room to feel curated, not accidental. Choose a simple, neutral-toned print with thin linework and a warm off-white mat so it matches the stone-gray wall and the cream lamp shade. If your landlord doesn’t allow nail holes, frame choice matters: Command-compatible hanging hardware (or picture-rail hooks if your rail exists) keeps it removable. The trade-off with DIY prints is that it takes a bit of patience, but the payoff is that the art looks one-of-a-kind while still reading minimal.
Make it instead of buying it
This pressed flower frame mimics the delicate, line-drawing vibe by arranging botanicals under glass and letting their natural structure do the detailing.
Materials
- Pressed botanicals (assorted sprigs) — small bundle — craft store — $12
- Glass-front frame (8×10 or similar) — 1 — thrift or craft store — $18
- Heavy white cardstock backing — 1 sheet — office supply — $10
- Clear craft tape or photo corners — set — craft store — $6
- Thin black marker (for subtle stem accents) — 1 — craft store — $7
Steps
- Choose a frame size and remove the backing and glass carefully.
- Lay botanicals on scrap paper to test spacing and negative space.
- Press stems and leaves flatter with your fingertips so they sit under the glass.
- Place the cardstock backing in the frame and position botanicals where the “lines” should read.
- Secure with small photo corners or clear craft tape so nothing shifts later.
- Add minimal black marker accents only where a stem needs clearer direction.
- Seal the glass in the frame and gently clean fingerprints off the surface.
- Hang using removable hardware appropriate for your wall type (no drilling).
Total DIY cost: $53 — saves about $27 over buying.
Layer 5 — Plug-in table lamp with fabric shade ($60) soft light where you need it
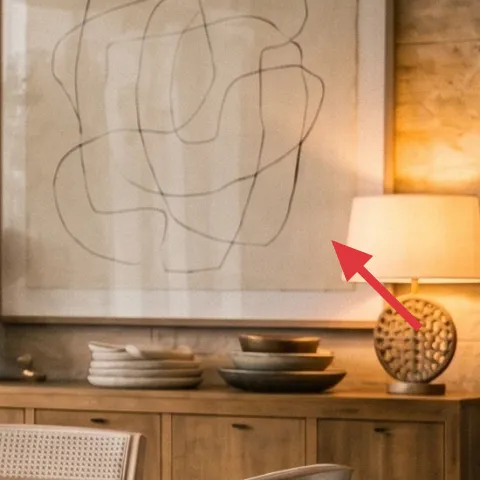
A plug-in table lamp with a fabric shade is the easiest way to copy the warm, contained glow from the hero without dealing with hardwired ceiling changes. Set it on the sideboard to create that “evening restaurant” feeling where the light lands across the table surface. Choose a shade in cream or warm beige so it works with both daylight and candlelight. The texture of the shade matters—fabric diffuses, while glossy shades can look harsh. The trade-off is you’ll need an outlet within reach, but plug-in placement is exactly why renter styling works so well here.
Don’t block the art with the lamp
If the lamp sits too high, it will visually compete with the framed abstract line drawing.
Layer 6 — Large ceramic vase ($30) organic shape for the center zone
A large ceramic vase pulls the whole dining nook toward an “arranged still life” feeling. In the hero, the vase shape is a matte, earthy ceramic that softens the warmth of the wood table and brings it back to the wall tones. Choose a neutral stone color (sand, oatmeal, or soft gray) and give it an organic bouquet: branches, dried greens, or a mix of stems that echo the room’s natural styling. If you go too glossy, the vase can reflect light in a way that looks less calm. The trade-off is vase size: it’s statement-scale, so keep the rest of the styling simple and allow it to lead.
Let the vase set the heights
Pick stems that reach about halfway to your lamp shade line so everything layers without crowding.
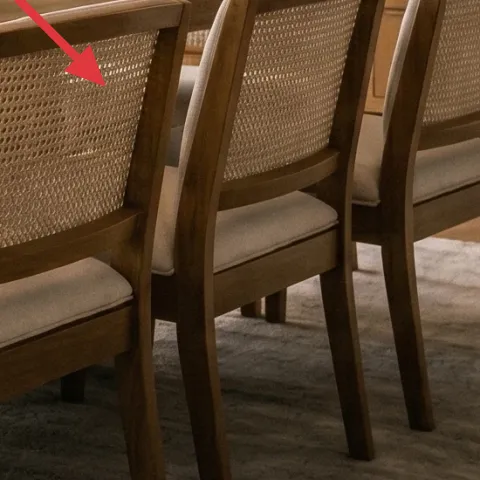
Layer 7 — Area rug ($200) grounds the dining set
An area rug is what makes a dining table feel like a destination instead of “furniture in a room.” The hero’s rug is a warm neutral with enough texture to handle everyday life, which is exactly what renters need. For a similar look, aim for a rug with muted gray-beige tones and a low-to-mid pile so chair legs glide without snagging. If your dining area is open to living space, choose a size that keeps the front legs of chairs on the rug to prevent the room from feeling disconnected. The trade-off is maintenance—textured neutrals hide stains better, but they still benefit from regular vacuuming.
Size up if you can
When in doubt, go bigger so chair legs stay on the rug during everyday pulls.
The cost, layer by layer
| Layer | Item | Cost |
|---|---|---|
| 1 | Folded linen cloth on table | $35 |
| 2 | Ceramic candle holder | $25 |
| 3 | Decorative tray | $35 |
| 4 | Pressed flower frame (DIY at retail equivalent) | $80 |
| 5 | Plug-in table lamp with fabric shade | $60 |
| 6 | Large ceramic vase | $30 |
| 7 | Area rug | $200 |
| Total | $465 | |
A cheaper route is keeping your existing rug and sideboard decor while swapping in the linen cloth, a plug-in lamp, and one framed art piece—those three changes usually carry the look for the least money.
What worked, what didn't (across the whole room)
The best wins here are texture-led: linen on the table, matte ceramic decor, and a neutral rug that visually “holds” the dining set. The framed line drawing also does a lot of heavy lifting by reading intentionally curated against the stone-tile wall. The only area that can slip into clutter is the sideboard—too many objects on one plane makes the warm palette feel busy fast.
What worked
- The linen cloth adds soft texture without introducing new color noise next to warm wood.
- The ceramic candle holder reads naturally on the sideboard, even when unlit.
- A tray makes grouped decor look styled rather than randomly placed.
- The framed line drawing keeps the room feeling gallery-like against the stone-gray wall.
- A plug-in table lamp creates a warm pool of light without any hardwired changes.
- A large ceramic vase sets the center-height rhythm for a calm still-life effect.
What didn't
- Over-tall centerpiece pieces can block the sightline across the dining chairs.
- Shiny decor finishes reflect lamp light and can make the palette feel louder.
- Adding too many small items onto the sideboard turns the tray surface into clutter.
- If the rug is too small, the dining zone loses its “together” feeling and looks floating.
- Pattern-heavy textiles compete with the minimal line drawing.
What we'd skip if we did it again
Skip buying a full table runner set. For this look, a single folded linen cloth or a simple runner in one neutral tone is enough—too many textile layers read busy next to warm wood and stone-tile texture.
Skip a too-tall candle or decor piece on the sideboard. The moment it rises into the same visual height as the art, it competes with the framed line drawing and makes the wall feel less balanced.
Skip a rug with high-contrast patterning. Muted, textured neutrals let the woven lighting and organic ceramic forms do the styling work, which is exactly what keeps the dining table nook feeling calm.
Frequently asked
How long does this dining nook refresh take?
Most people can finish the swap-and-style version in 2–4 hours. The timeline usually breaks down into (1) setting up the plug-in lamp and arranging decor on the tray, (2) positioning the rug so chair legs sit correctly, and (3) making or hanging the framed pressed flower art. If you DIY the frame, add time for pressing botanicals or choosing already-pressed pieces.
Is this renter-friendly if I can’t drill or use wall anchors?
Yes. The layers are movable: a plug-in lamp, freestanding ceramic and tray styling, an area rug, and framed art that can be hung with removable hardware that doesn’t require drilling. The linen cloth and candle holder are also fully lease-end friendly, since nothing is permanently attached to walls or built-ins.
What if my dining area is smaller than the photo?
Go smaller on the rug first, but keep the shape and tone consistent. For a compact dining nook, aim for a rug size that still holds the front chair legs. For the tabletop layer, stick to one cloth and avoid extra centerpiece height. The ceramic vase should be proportionate—choose shorter stems so the visual height doesn’t overwhelm the room.
What if my dining room is larger or open to a living space?
In a more open plan, you’ll usually want a larger rug to define the dining zone. Maintain the same palette rules: warm wood, cream textiles, and one muted “gray” element from the wall tone or decor. Keep the sideboard styling grouped on one tray so the dining area reads intentional rather than scattered.
Where should I shop for these parts differently than “full furniture stores”?
For the lamp and candle holder, look at home decor retailers and online marketplaces that sell plug-in table lamps and ceramic accents. For the rug, dedicated rug shops or marketplace sellers often have better neutral options. For the pressed flower frame, thrift stores for frames plus craft stores for pressed botanicals can get you close to the look for less than buying a new ready-made print.
What’s the biggest mistake people make in this kind of dining styling?
The most common miss is over-styling the sideboard or centerpiece height. If there are too many small objects, the tray surface stops looking curated. And if the candle holder or vase is too tall, it blocks sightlines across the table. Choose one hero object per surface and keep the rest minimal.
More in Living Room
Wood-and-rattan dining refresh, $500
A rented-dining-style refresh with warm wood, rattan lamps, and stone-gray accents—built with seven no-drill swaps. For about $500 total, i…

A calmer sofa seating area for $600
This sofa seating area refresh shows a renter-friendly japandi look with soft neutrals, olive accents, and plants. For about $600, you can …
7 no-drill refreshes for a $600 sofa living room
A move-friendly sofa living room refresh for shared housing, built around warm neutrals and zero permanent changes. This $600 plan focuses …